Simple Video Editor
This section explains the simple video editing function.
Simple Video Editor screen
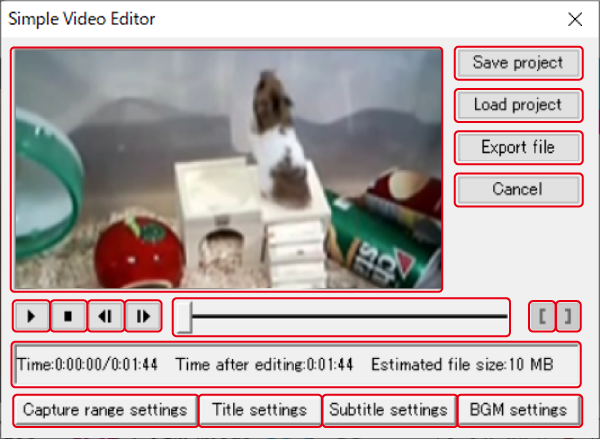
- Preview screen
- Displays a preview of the video file you are editing.
- [Play / Pause] button
- Play/pause the video. It functions as the [Play] button when the video is stopped or paused, and as the [Pause] button when the video is playing.
- [Stop] button
- Stops the video. Pressing the [Stop] button during playback or pause will return the playback to the video start position.
When editing a video, the changed settings will be reflected in the preview screen. - [Back] button
- Reverses the playback position by the specified time.
The movement time is specified by "Seek interval" in the right-click menu.
Select from "0.5 sec," "1 sec," "2 sec," "5 sec," "10 sec," or "Any time”.
If you select arbitrary time, the "Seek interval" dialog is displayed. - [Forward] button
- Advances the playback by the specified time.
The movement time is specified by "Seek interval" in the right-click menu.
Select from "0.5 sec," "1 sec," "2 sec," "5 sec," "10 sec," or "Any time”.
If you select arbitrary time, the "Seek interval" dialog is displayed. - Seek bar
- You can use the slider to specify the playback position of the video.
If you specify capture range, the capture range is displayed. - [Start position setting] button
- Specify the start position of the video capture range and the start position of subtitle display.
You cannot move to the right of the end position. - [End position setting] button
- Specify the end position of the video capturing range and the end position of the subtitle display.
You cannot move to the left of the start position. - Information display
- Displays information about the video being edited.
- Time Playback position [HH: MM: SS] / Total time [HH: MM: SS]
- Time after editing [HH: MM: SS]
- Estimated file size [TB / GB / MB / KB / bytes]
Displays the estimated file size based on the bit rate of the set compression format.
- [Capture range settings] button
- Click to display the "Capture range settings" screen.
Specifies the video capture range. - [Title settings] button
- Click to display the "Title settings" screen.
You can put a title in the video. - [Subtitle settings] button
- Click to display the "Subtitle settings" screen.
You can set subtitles for your video. - [BGM settings] button
- Click to display the "BGM settings"screen.
You can set background music for your video. - [Save project] button
- Save your video edits as a project.
- [Load project] button
- Select the project in which you saved your edits and load it.
- [Export file] button
- Save the edited video as an encoded video file.
- [Cancel] button
- Finish editing and return to the main screen.
Right click menu
This menu is displayed when you right-click on the Simple Video Editor screen.
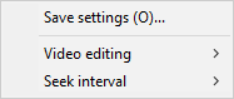
- Save settings
- You can set the video format and bit rate for Export file.
- Video editing
- Displays the settings screen for video editing.
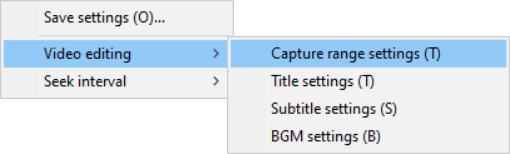
“Select from "Capture range settings", "Title settings", "Subtitle settings", and "BGM settings”.
- Seek interval
- Sets the time movement unit for the [Back] and [Forward] buttons.
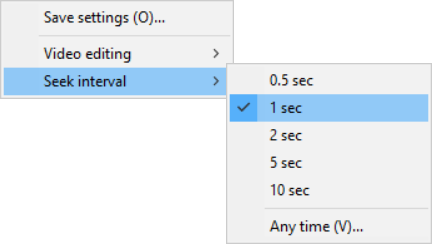
Select from "0.5 sec," "1 sec," "2 sec," "5 sec," "10 sec," or "Any time”.
Select "Any time” to display the "Seek interval" dialog box.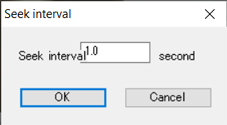
Enter the "Seek interval" and click the "OK" button.
Editing Video (Overview)
This section explains the video editing procedure.
- Select the video you want to edit in the library and click the [Edit Video] button.
- You can also choose "Edit" from the right-click menu.
- You can also choose "Simple Video Editing" from the Edit menu.
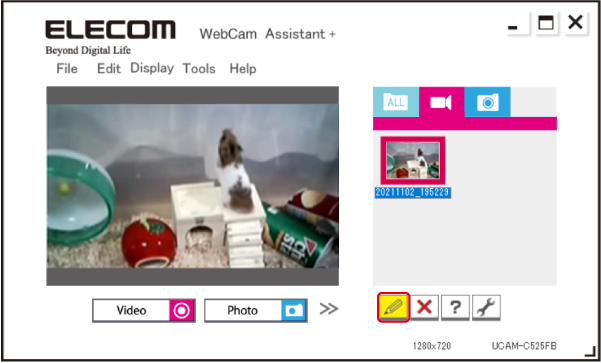
- The [Simple video edit] window will appear.

- Set the capture range.
- Set the title
- Set the subtitles
- Set the BGM.
- When all the settings are done, click the [Play] button to view the preview and confirm your edits.
- Click the [Export file] button to export the video.
To stop editing videos
- click the [Cancel] button during video editing.
- Click the [Yes] button.
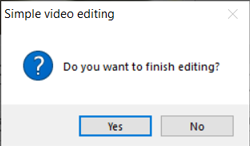
Click the [No] button to return to the simple video editing screen.
- If you want to save the data you are editing as a project, click [Yes].
If you don't want to save the file, click [No]
Click the [No] button to return to the simple video editing screen.
- Enter a project name and click the [Save] button.
- Exit the simple video editing screen and return to the main screen.
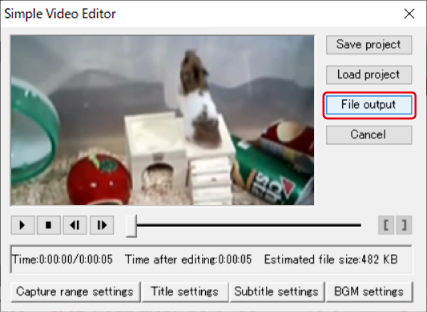
Export the video
Export the edited content to video.
- Click the [Export file] button.
The "Save Settings" dialog box will appear.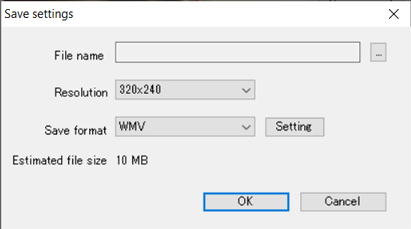
- Select the output resolution for the video.
- Select a output format for the video.
Click the [Setting] button to display the settings window corresponding to the save format.  click
click
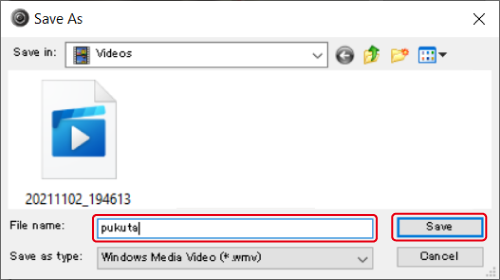
The "Save As" dialog box will appear.- Specify a location to save the file, enter a file name, and click the [Save] button.
- Click the [OK] button.
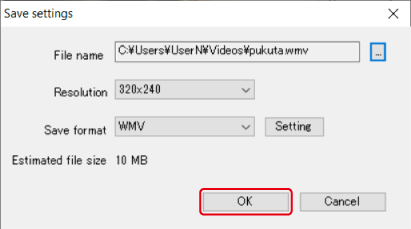
- Return to the Simple video Edit screen and start exporting.
A preview will be displayed while the video is exporting.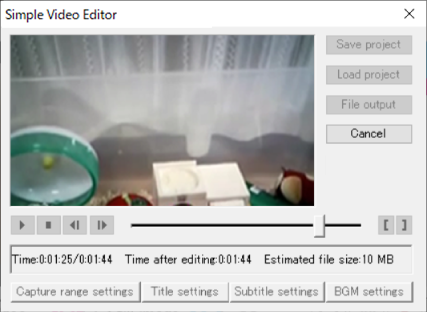
- Clicking the [Cancel] button during video output will abort the video output.
- Clicking the [Cancel] button during video output will abort the video output.
- When the video is finished, it will return to the main screen.
The exported video files are registered in the library.
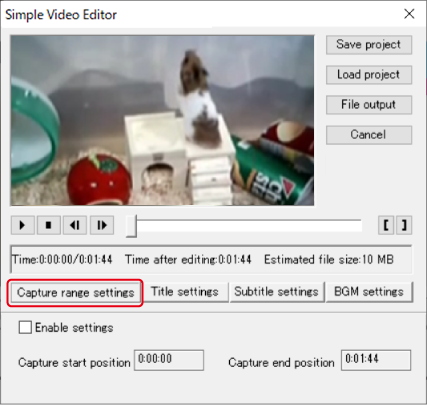
Capture range settings
- Click the [Capture range settings] button.
The "Capture range settings" window will appear.
- Use the seek bar to move to the start position of the capture, then click the [Start position setting] button.
You can also use the [Back]/[Forward] buttons to fine-tune the position.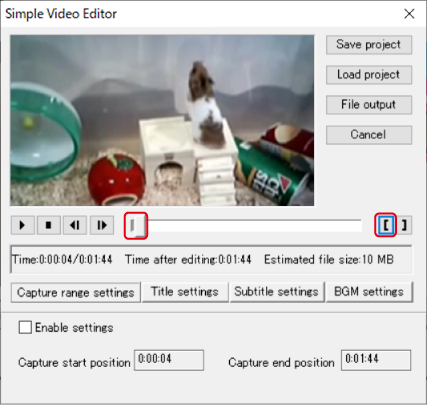
- Move the cursor to the end position of the image to be captured, and click the [End position setting] button.
You can also use the [Back]/[Forward] buttons to fine-tune the position.
- Check the "Enable settings" checkbox.
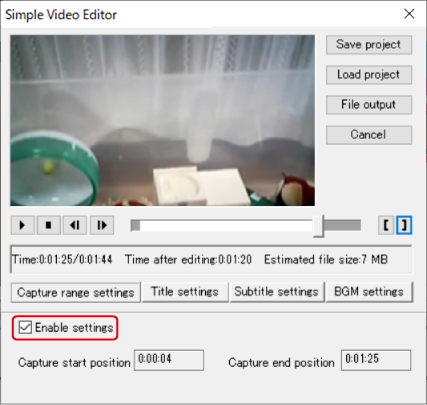
- If you do not check the "Enable settings" checkbox, the settings will not be reflected in the video output.
- If you do not check the "Enable settings" checkbox, the settings will not be reflected in the video output.
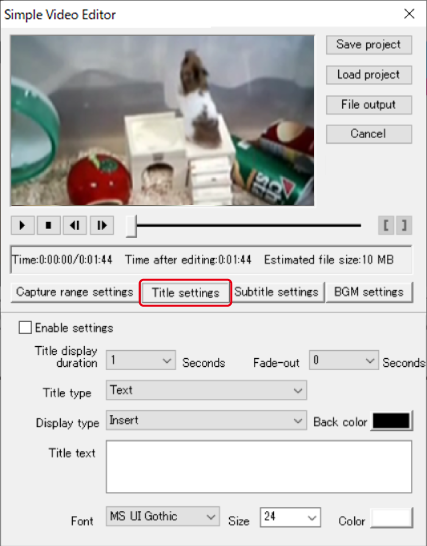
Title settings
- Click the [Title settings] button.
The “Title settings” screen appears.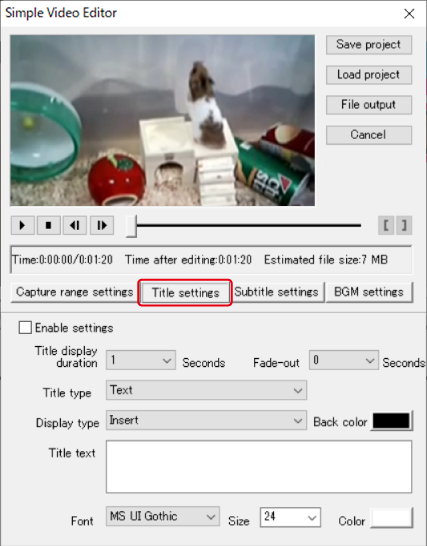
- Set the various items.
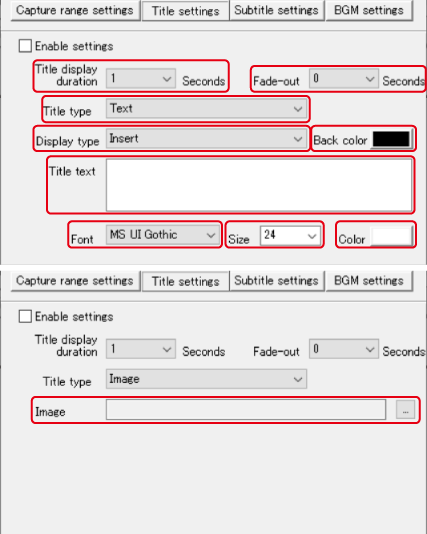
- Title display duration
- Set the display time of the title from 1 to 10 seconds in 1-second increments.
- Fade-out
- Set the fade-out time after the end of the title display from 1 to 10 seconds in 1-second increments.
When "0" is set, the video will end without fading out. - Title type
- "Text"
Use text for the title. It can also be superimposed on the video screen.
"Image"
Use a separately prepared image for the title. - Display type
- Set this when "Text" is selected as the title type.
"Insert”
Displays the title before the video starts.
"Overwrap”
Overlay the title text from the beginning of the video. - Background color
- When "Insert" is selected, you can select a background color for the text title.
- Title text
- Enter the text you want to appear in the title.
- Font
- Select the font of the characters used for the title.
- Size
- Select the font size to use for the title.
- Color
- Select the text color to use for the title.
- Image
- Set when "Image" is selected as the title type.
Click to select the image you want to use for the title.
- Check the "Enable settings" checkbox.Click the Play button to see a preview.
- Click the "Stop" button to reflect the changed settings on the preview screen.
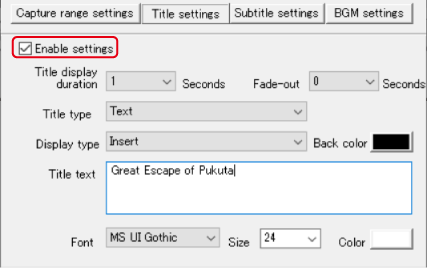
- If you do not check the "Enable settings" checkbox, the settings will not be reflected in the video output.
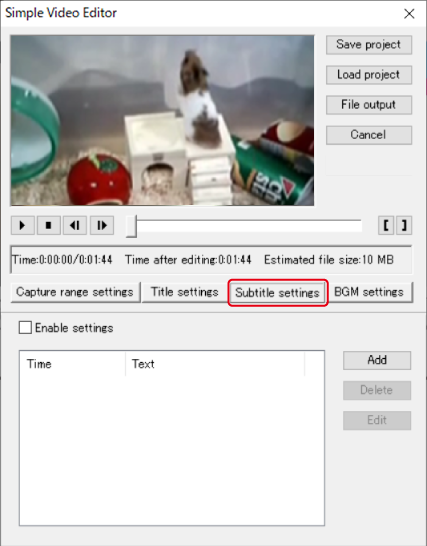
Subtitle settings
- Click the [Subtitle settings] button.
The [Subtitle settings] screen appears.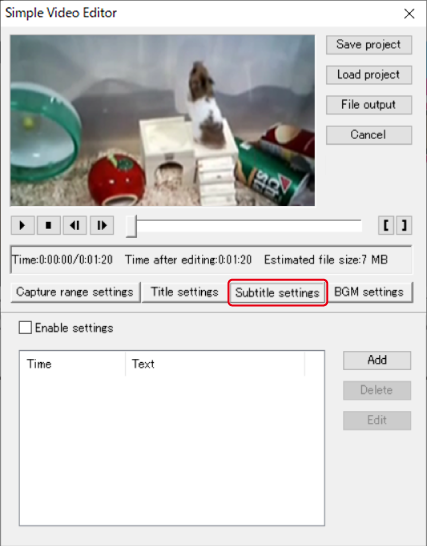
- Use the seek bar to move to the start position of the subtitle and click the [Start position setting] button.
You can also use the [Back]/[Forward] buttons to fine-tune the position.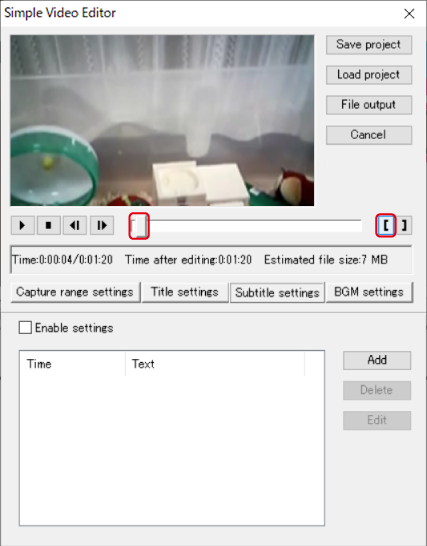
- Move to the end position of the subtitle and click the [End position setting] button.
You can also use the [Back]/[Forward] buttons to fine-tune the position.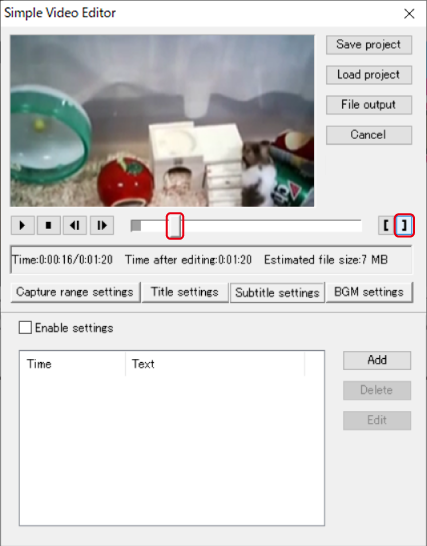
- Click the [Add] button.
The "Subtitle editing" dialog is displayed.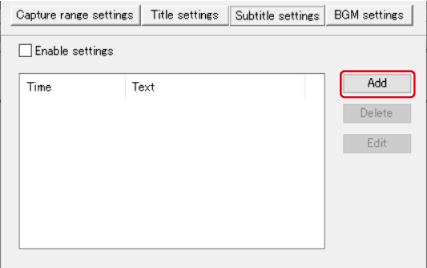
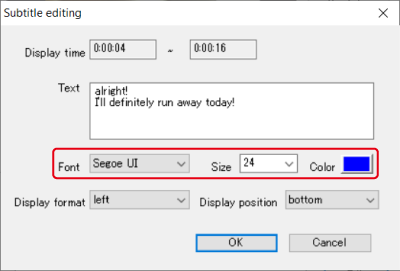
- Enter in the text field the text you want to display in the subtitles.
- Set the font, size and color.
- Select the display format.
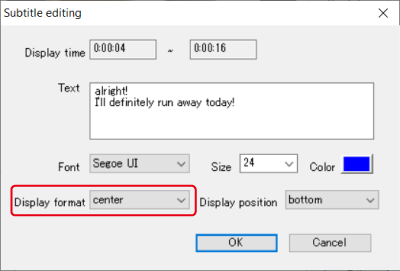
- left
- The subtitles are displayed at the left side of the screen.
- center
- Display the subtitles in the center of the screen.
- right
- The subtitles are displayed at the right side of the screen.
- scroll (normal)
- Display subtitles scrolling from the right side to the left side of the screen.
- scroll (speed)
- Subtitles are scrolled from the right side to the left side of the screen at high speed.
- scroll (high speed)
- Subtitles are scrolled from the right side to the left side of the screen at super high speed.
- Select the display position.
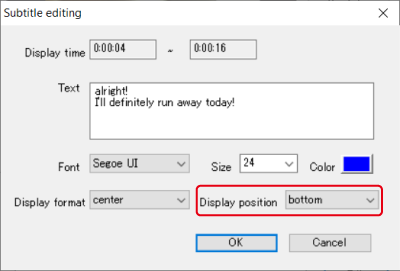
- top
- Subtitles are displayed close to the top of the screen.
- center
- Display the subtitles in the center of the screen.
- bottom
- Subtitles are displayed at the bottom of the screen.
- Click the [OK] button.
The screen returns to the "Subtitle settings" screen.
- If you want to put subtitles in several places, repeat steps 2-8.
- Check the "Enable settings" checkbox.Click the Play button to see a preview.
- Click the "Stop" button to reflect the changed settings on the preview screen.

- If you do not check the "Enable settings" checkbox, the settings will not be reflected in the video output.
To edit the set subtitles
Select the subtitle you want to edit and click the Edit button.
The "Subtitle settings" dialog is displayed. Edit it and click the [OK] button.
To remove subtitles
Select the subtitle you want to delete and click the [Delete] button.
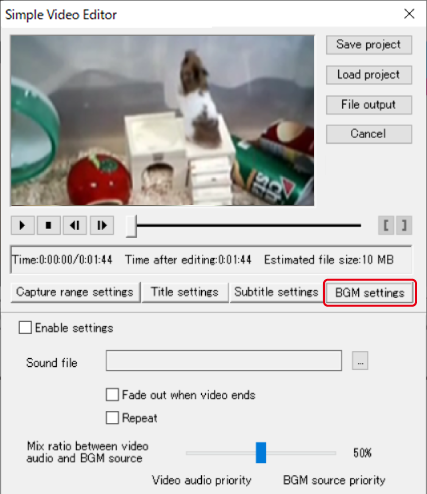
BGM settings
- Click the [BGM settings] button.
The "BGM settings" screen is displayed.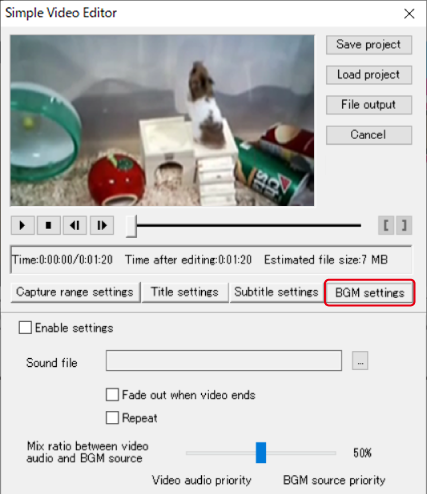
- Click
 to select the music file you want to use for background music.
Music files in ".wav", ".wma" and ".mp3" formats can be used. - Make the following settings as needed.
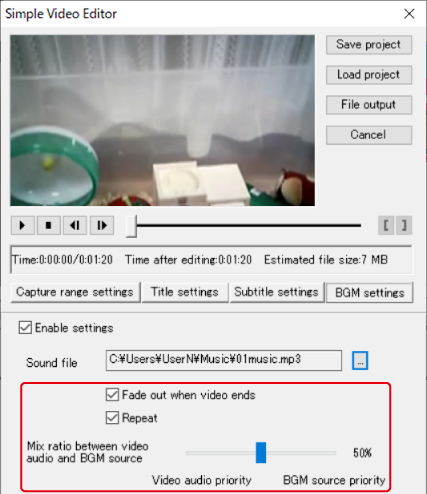
- Fade out when video ends
- Switch ON, and the music will fade out at the end of the video.
Prevents the music from ending abruptly if the background music is longer than the total time of the video. - Repeat
- Switch ON, and the BGM is played repeatedly during video playback.
- Mix ratio between video audio and BGM source
- Use the slide bar to set the mixing ratio between the video audio and the BGM sound source.
If you slide toward the video / audio priority, the audio of the video will be louder.
If you slide toward the BGM sound source priority, the BGM sound source will become larger.
- Check the "Enable settings" checkbox.Click the Play button to see a preview.
- Click the "Stop" button to reflect the changed settings on the preview screen.
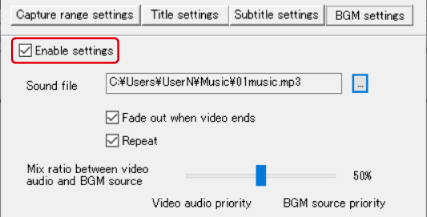
- If you do not check the "Enable settings" checkbox, the settings will not be reflected in the video output.
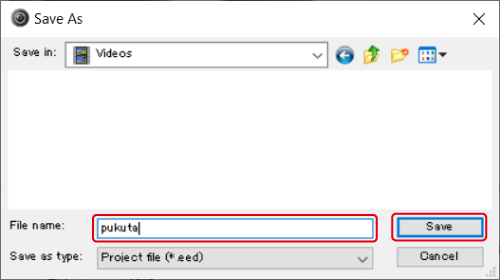
Save the edited content of the video as a project
Save the edited content of the video as a project.
Saved projects can be loaded later for re-editing and video output.
- After editing the video, click the [Save project] button.
The "Save As" screen is displayed.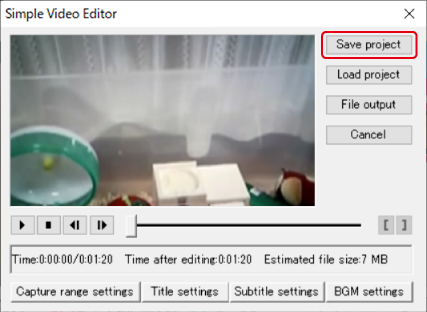
- Enter the file name and click the [Save] button.
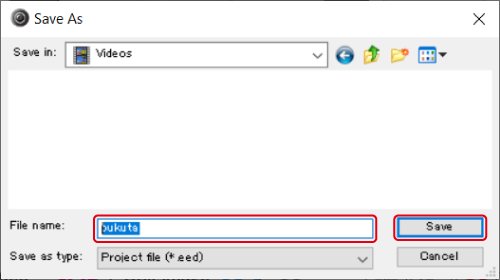
- The screen returns to the simple video editing screen.
Use the saved project
You can use the previously created project file to output video.
- Click the [Simple video Edit] button.
You don't have to select a file in the library.- You can also choose "Edit" from the right-click menu.
- You can also choose "Simple vide Edit" from the Edit menu.
The [Simple video Edit] window will appear.
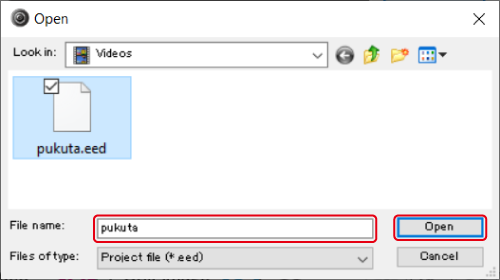
- Click the [Load project] button.
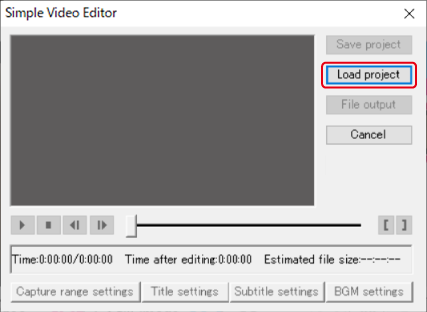
- Select the saved project and click the [Open] button.
- Change the settings as needed.
- If you want to save it as a project, click the [Save project] button.
- To output video, click the [Export file] button.