|
Uninstalling the application will delete all data. |
After installing the application, the Software Product License appears
at the initial startup. |
![]() Select Calendar Storage Location
Select Calendar Storage Location
|
There are two locations to which a calendar can be saved; Schedule St.
and Google calendar.
|
 |
|
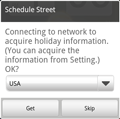
After installing the application, a screen appears at initial startup enabling
acquisition of holiday information.
|
 |
|
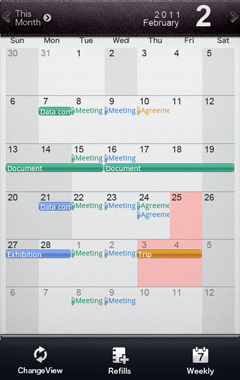
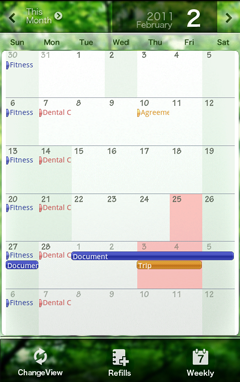
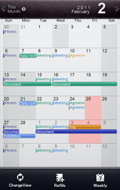
Ex) Calendar View A shows plans of Calendar Groups A and B, whereas Calendar
View B shows a plan of Calendar Group A only. |
|
|
|
|
|
• |
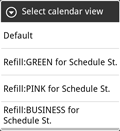
An additional refill allows individual designs to be set up for each Calendar View, enabling easy identification of which which calendar is currently in use. |
|
| • | Touch: Refills at the bottom of the calendar screen to display a list of designs and functions that can be added. (Refer to "List of refill") |
|
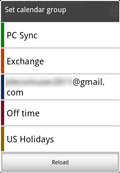
When Google calendar is selected as Calendar storage location,
creation, change, or deletion of Calendar Group cannot be performed.
(Refer to"Calendar storage location") |
1
Press the MENU button on the Calendar screen.

The Calendar screen can be displayed as any of Monthly display, Weekly display or Daily display.
2
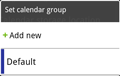
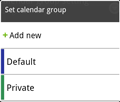
Touch: Settings > Calendar group setting
3
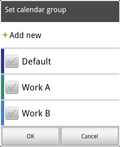
Touch: +Add new
When Google calendar is being used, a group list is displayed. Touching Reload displays the latest list.
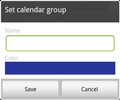
4
Input the required information.
Name
Input the name of Calendar Group.
Color
An individual color can be assigned to a group.
Items outside the screen area can be revealed by scrolling.
5
When the input is complete, touch: Save.
A newly created Calendar Group will be added to the list.
|
The Calendar Group list can be displayed as follows. Press the MENU button, and touch: Settings > Calendar group setting. To change or delete a calendar group, select the target group from the list.
|
|
• |
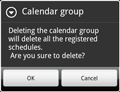
When a registered schedule in a calendar group is to be deleted, a confirmation
screen appears. |
|
| • | Editing can be performed using the Operation menu. This can be displayed by selecting the Calendar Group name in the list. |
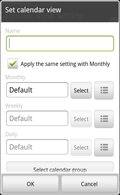
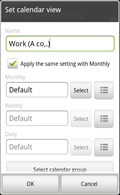
1
Press the MENU button on the Calendar Screen.
The Calendar screen can be any screens of Monthly display, Weekly display or Daily display.
2
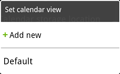
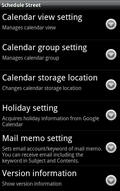
Touch: Settings > Calendar view setting
3
Touch: +Add new
4
Input the required information.
Name
Input the name of the calendar view.
Apply the same setting with Monthly
Placing a checkmark enables simultaneous application of the refill settings to Monthly, Weekly and Daily displays.
Monthly/
Weekly/Daily
Touching Select displays a list of refills that can be edited. From the list, select a refill option to set.
• A different refill can be set to Monthly/Weekly/Daily.
•
Placing a checkmark next to "Apply the same setting with Monthly" enables simultaneous assignment of the same refill to that of Weekly and Daily.
• Refills can be additionally purchased.
Touch: Refills at the bottom of the calendar screen to display a list of designs and functions that can be added. (Refer to "List of Refills")Touching this button enables to display the View app settings screen. Set the required parameters for the view application. (Refer to "View app settings")
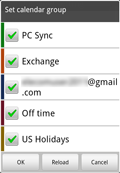
Select Calendar Group
Select the Calendar Group displayed in the calendar, and touch: OK.
•
You can select multiple calendar groups.
• Selection and de-selection toggles, so to release the selected status, touch the selected item again.
• When Google calendar is used, Reload is displayed.
Touch: Reload to display the latest list.
5
When the input is complete, touch: OK
The newly created Calendar View will be added in the list.
The list of Calendar Views can be displayed as follows. Press the MENU button, and touch: Settings > Calendar view setting. To change or delete a calendar view, select the target view from the list.
To change, change the registered information and touch: Completed.
To delete, touch: Delete.
Editing can be performed using the Operation menu. This can be displayed by selecting the Calendar View's name in the list.
|
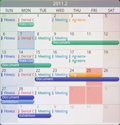
Schedules can be displayed monthly or weekly. |
|
|
Flicking right/left can switch the calendars between previous month/next month as well as previous week/next week. |
|||
With multiple Calendar Views, the calendar can be switched by flicking
up and down.
|
|||
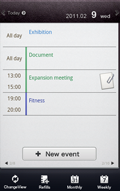
Touch: Date to switch the screen to Daily. The schedule list registered for that day is displayed.(Refer to "Daily screen") |
|||
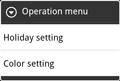
Touch: Date to enable Holiday setting and Color setting. (Refer
to "Customizing holiday settings and the color assigned
to a date") |
|||
To switch to the Weekly or Monthly screen, touch: Weekly display and/or Monthly display" respectively. |
|
||
When there are too many plans to fit on the display, an icon appears indicating that the display area has been exceeded. |
|||
In Schedule St., a banner advertisement appears in the upper part of
the calendar if no additional refills have been purchased. Clicking on
an advertisement will automatically start up the web browser which will
display the linked site. |
|||
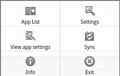
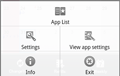
A corresponding application can be started as follows. Press the MENU button, and touch: App List (Refer to "Starting up Corresponding Applications") |
 |
||
The Setting screen is displayed as follows. Press the MENU button, and touch: Settings (Refer to "Operation on Setting Screen") |
|||
The View app settings screen is displayed as follows. Press the MENU button, and touch: View app settings (Refer to "Operation on the View app settings Screen") |
|||
The software version of Schedule St. and a link to the on-line manual are displayed as follows. Press the MENU button, and touch: Version information |
|||
The application is shut down as follows. Press the MENU button, and touch: Exit |
|||
When selecting Google calendar for Calendar storage location, a Synchronization button appears.(Refer to "Synchronizing with Google calendar") |
|
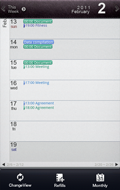
The Daily screen enables display of the plan for each day. |
 |
|
When a plan has some more additional information available, an icon showing
that further information is available appears at the right side of the
title. |
|||
Flicking left switches to the calendar for the next day, and flicking right switches to the calendar for the previous day. |
|||
When creating multiple calendar views, flicking up and down switches the
calendar through the views.
|
|||
To switch to the Weekly screen or Monthly screen, touch the Weekly display or the Monthly display respectively. |
|||
Clicking on the title of a schedule displays the Event Description screen.(Refer to "Event Description screen") |
|||
| To register a new schedule, touch: +New event (Refer to "Registering Schedules") |
|||
Holding the title displays the Operation menu. |
|||
Corresponding application can be started as follows. Press the MENU button, and touch: App List (Refer to "Starting up Corresponding Applications") |
|
||
The Setting screen is displayed as follows. Press the MENU button, and touch: Settings (Refer to "Operations in the Setting Screen") |
|||
The View app settings screen is displayed as follows. Press the MENU button, and touch: View app settings (Refer to "Operation on the View app settings Screen") |
|||
The version of application and the URL of on-line manual are displayed as follows. Press the MENU button, and touch: Version information |
|||
The application is shut down as follows. Press the MENU button, and touch: Exit |
|||
When selecting Google calendar in Calendar storage location, a Synchronization button is added.(Refer to "Synchronizing with Google calendar") |
|
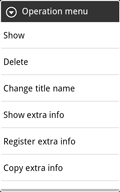
Touching the title name on the Daily screen displays the Event description screen. |
 |
The Event description screen enables to select various functions such as editing and deleting of plans, as well as adding and deleting of additional information. (Refer to "Changing/Deleting Schedules") |
||
Touching |
||
Holding |
||
Holding the icon at the left side of title on the extra information list changes to Move mode, in which the order of the items displayed can be switched. |
||
Touching the "-" button at the right side of title on the extra information list enables deletion of the extra information with confirmation. |
|
The holiday setting on the calendar as well as the color of the date can
be customized. |
 |
Setting Holidays
1
On the calendar, depress the date to set to a holiday.
2
Select Holiday setting, and on the Holiday setting screen select Holiday ON, then touch: OK.
To release the holiday status, select Holiday OFF.
Saturdays and Sundays cannot be set to holidays.
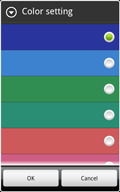
Changing the Color assigned to the Date
1
On the calendar, depress the date whose color is to be changed.
2
Select Color setting, select the desired color and touch: OK.
1
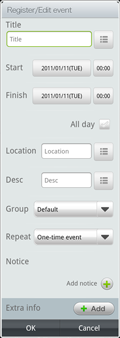
Display the calendar to input the schedule.
This function is available in either the calendar screens of Monthly display or Weekly display.
2
Touch the date to input the schedule.
To input a schedule to dates other than within the current month or current week, change the calendar display by flicking right/left.
3
Touch: +New event
4
Input the required information.
Hidden items can be revealed by scrolling.
Title
Input the title name of the schedule. Touching
displays the input history.
Start
Select the start date/time of the schedule.
Finish
Select the end date/time of the schedule.
All day
Place a checkmark when the schedule lasts all day.
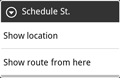
When this option is selected, Start and Finish select only date, not time.Location
Input the location for the schedule. Touching
Contents
Input the contents of the schedule. Touching
Group
Select Calendar Group to be registered.
Touching this option displays the Calendar Group list registered to Calendar View that is currently selected.
•
When Calendar Group is not registered to Calendar View (which is the initial setting) or when there is only one Calendar Group registered, the selection button becomes grayed-out.
• The list does not include any Calendar Group which is not editable, for example National Holidays, Friend's Calendar.
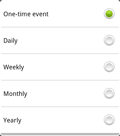
Repeat
Touching this button displays the selection screen.
To set a repeated schedule, select the day for the repeated schedule.
When Repeat is set, the same schedule is automatically added.
Notice
Select the time to set a schedule alert notice. The alert notice gives notice of the forthcoming schedule.
Touch: + of Add Notice to display the selection button for setting the time of the alert notice.
Touch the button, and on the selection screen select the alert notice.
Touching + of Add Notice can add the alert notice time.
To delete the set alert, touch: - of the alert notice time.
Setting the alert notice time gives notice of the schedule prior to the selected time via a Note to Notice bar + Vibration function.
Extra Information
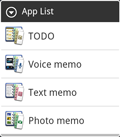
Extra information such as TODO, Voice memo, Text memo, Photo memo, and Mail memo can be added to the schedule.
Touch: +Add, to display the selection screen for the extra information that can be added.
Select the memo to add, and touch: Register.
Multiple additional information items can be registered at one time.
For creating TODO, Voice memo, Text memo, and Photo memo, refer to Starting up Corresponding Applications.
TODO enables creation of a new group and new memo, as well as sorting functions.(Refer to "Creating Group, Creating TODO, Sorting (Shifting Order)".
Voice memo creates a new voice memo. (Refer to "Creating Voice Memos")
Text memo creates a new text memo. (Refer to "Creating Text Memos")
Photo memo creates a new photo memo. (Refer to "Creating Photo Memos")
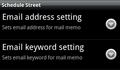
Mail memos:
Setting a mail address and keyword at the Mail Memo Setting on the Setting Screen extracts the messages with the selected keyword from the received mail messages, and displays this information as a list.
The contents selected from the list and registered are then handled as a text memo.(Refer to "Setting Mail Memos")
5
When the input is complete, touch OK.
The schedule is registered.
1
On a calendar, touch the date to be duplicated/changed/deleted.
The schedule list is displayed.
2
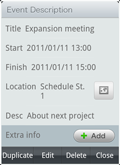
From the displayed list, touch the title to be duplicated/changed/deleted.
The Event Description screen is displayed.
To duplicate the schedule, touch: Duplicate
A confirmation screen for duplication appears; touch: Yes
Change the registered contents on the Register/Edit event screen, and touch: OK
Change the registered contents on the Register/Edit event screen and touch: Complete
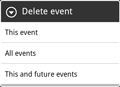
A confirmation screen for deletion appears; touch: Delete
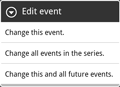
•
Changing/deleting the schedule set by Repeat will display a confirmation screen. Select the schedule to be changed/deleted.
Select Memos to register and touch: Register
A confirmation screen for deletion "Delete. Are you sure?" appears; touch: Yes
For voice memo, touch the Replay button to replay the message.
1
Touch the Menu button and Search from either of Monthly, Weekly, or Daily screen.
A searching screen appears.
2
Input a keyword to Search Keyword to set Search period, and touch Search.
Note that plural words cannot be entered to Search Keyword.
Search starts.
3
Touch the search result.
The Event Description screen is displayed.
|
This application allows synchronization with Google calendar. |
|
• |
To register the extra information to the Google calendar schedule, the registered information can be referred only through this application. |
|
| • | If Google calendar is being used with this application, a Synchronizing
option is added to the list of functions displayed by touching the Menu
button. Touching Synchronizing starts synchronization with Google calendar.
The Synchronizing button is not displayed unless Google calendar is being
used. |
To purchase refills, touch the Refills option at the bottom of Calendar
screen. |
|
 |
|
|
The View app display can be set to each Monthly screen/Weekly screen/Daily
screen. |
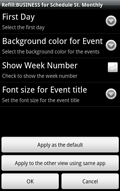 |
First DayThe starting day of the week for the event can be set. |
Show Week NumberPlacing a checkmark displays a week number. |
Font size for Event titleThe font, point sizes for event title can be set. |
During the startup of this application, the corresponding applications such as TODO, Voice Memo, Text Memo, Photo Memo can be also started up. |
1
With the Calendar screen displayed, press the MENU button and then touch: App List
A list of applications which can be started up is displayed.
This function is available in either calendar screens of Monthly display, Weekly display, or Daily display.
2
Touch the button of the desired application to start up.
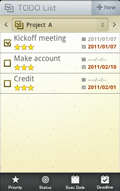
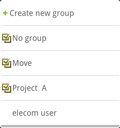
Registering TODO takes according to each group for a specific purpose allows the list to be easily viewed. |
1
On the TODO List screen, touch the list box of the target group.
2
Touch: +Create new group
3
On the Creating Group screen, input the name of group.
4
Touch: Register
A newly registered group name is added to the list.
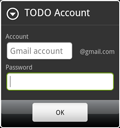
When Google calendar is selected as the calendar, the TODO list within Google calendar can be used. |
1
On the TODO List screen, press the MENU button, and touch: Settings
2
Touch: TODO Account
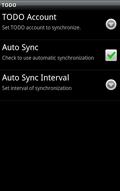
3
Input the account name and password, and touch: OK
4
To automatically synchronize, place a checkmark next to Automatic Synchronization, and then touch: Interval of Automatic Synchronization to select the desired interval.
A list registered to the TODO list of Google calendar is added to the TODO list as a group.
From the TODO list, the list registered by the TODO application can be identified with
at the beginning of the list name.
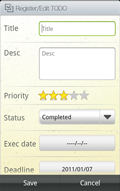
1
On the TODO List screen, touch: +New
2
Input the necessary information on the TODO Register/Edit screen.
In the TODO list, Title Name, Priority, Exec Date, Deadline, and Status are displayed.
Status is displayed in the checkbox at the right side of the title on the list box.
With checkmark indicates: Completed
Without checkmark indicates: Not completedSetting Priority, Status, Execute Date, Deadline can sort on the TODO List screen. (Refer to "Sort (Change Order)")
In the group, group name selected at the TODO List screen is displayed by the initial setting.
3
When the input is completed, touch: Save.
The TODO newly registered is added to the list.
1
On the TODO List screen, select group.
2
Touch the TODO title to be corrected.
3
On the TODO Register/Edit screen, correct the data.
4
When the correction is completed, touch: Save.
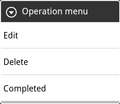
On the TODO List screen, depressing the TODO title displays the Operation menu.
The Operation menu gives access to Edit, Delete, and Completed..
1
Select the target group on the TODO List screen.
2
Touch the title of TODO list to check.
The registered information is displayed.
When the TODO list name for Google calendar is selected for the group, touching the Menu button and selecting Synchronization on the List screen starts the synchronization with Google calendar.
1
Select the target group on the TODO List screen.
2
To sort the TODO list, touch: Sort
Sorting is available with the following parameters; Priority, Status, Exec Date, Deadline.

1
On the TO-DO list screen, touch: Menu, and Setting
2
The following settings are available:
Checking this option shows the execution date for the TO-DO on the calendar.
Checking this option shows the deadline for the TO-DO on the calendar.
Touch to select the calendar view to show TO-DO.
1
On the Voice Memo screen, touch: +New
2
Touch: Record
3
When the recording is completed, touch: Stop
4
Return to the Voice Memo screen.
Voice memos are automatically saved.
Titles are automatically saved. The file name consists of Year, Month, Day and Time.
For example; the title of the file in which recording started on 21:34':22", November 2, 2010 would appear as: 20101102213422Title is editable. (REfer to "Voice Memo Functions on the Operating Menu")
1
On the Voice Memo screen, touch the title of voice memo to replay.
2
Touch the Replay button to replay the message.
During replay, the Replay button temporarily switches to the Pause button.
The Replay position can be specified by the slider.
|
On the Voice Memo screen, depressing the title name displays the Operation
menu screen. |
 |
The audio data created by Voice Memo can be shared with external applications. |
1
Depress the title of Voice Memo to be shared on the Voice Memo screen, and touch: Share from the operation menu.
2
Touch the application to share.
An audio data created by the external applications can be imported to voice memos.
The data type of Voice Memo to import is “3GPP music file (3gp). |
The importing step depends on the external application. |
1
On the Text Memo screen, touch: +New
2
Input text.
3
Return to the Text Memo screen.
Text is automatically saved.
1
On the Text Memo screen, touch the text memos to correct.
2
Correct the text.
Depressing on the input screen in which the text has been already entered displays a text edit menu.
The Text Edit Menu allows access to operations as Select all, Select Text, Cut all, and Copy all.
3
Return to the Text Memo screen.
1
On the Text Memo screen, touch the title of text memo.
The recorded information is displayed.
|
On the List screen of Text Memo, depressing the title name displays the
Operation menu screen.
|
 |
The text data created by Text Memo can be shared with external applications. |
1
On the Text Memo Edit screen, touch: Menu, and Share
Or, on the Text Memo screen, depress the title of Text Memo to share, and touch Share on the Operation Menu.
2
Touch the application to share.
A text created by external applications can be imported to Text Memos.
The data type of Text Memo to import is “txt.” |
The importing step depends on the external application. |
1
On the Photo Memo screen, touch: +New
This switches the camera mode.
2
Take a photo.
The Photograph function uses the phone's built-in camera.
For detailed operation, refer to the phone manual.
3
Touch: OK
Photo Memos are automatically saved.
Titles are automatically saved. The file name consists of Year, Month, Day and Time.
For example, the title of the file in which photos are taken on 21:34':22"on November 2, 2010 would appear as: 20101102213422.Title is editable.(Refer to "Photo Functions on the Operation menu")
1
Touch the title on the Photo Memo screen.
The Application Selection screen is displayed.
2
Select the viewer application.
Place a checkbox next to "Use by default for this action" and then select the application. This allows to the application selection screen to be hidden next time this facility is used.
| On the Photo Memo screen, depressing the title name displays the Operation
menu screen.
|
 |
A photo created by Photo Memo can be shared with external applications. |
1
On the Photo Memo screen, depress the title of Photo Memo to share, and touch Share on the Operation Menu.
Using share function for Photo Memo in the preview depends on the type of your smartphone.
2
Touch the application to share.
A photo created by external application can be imported to Photo Memo.
The data type of Photo Memo to import is “JPEG file (jpg).” |
The importing step depends on the external application. |
By copying the corresponding memos (Extra Information) to the clipboard,
memos can be pasted into a schedule. |
1
Start the application as follows. Press the MENU button, and touch: App List
2
Depress the title name of the memo to paste.
3
On the displayed Operation menu screen, touch: Copy extra info
The selected memo is copied to the clipboard.
4
Display the schedule list on the calendar, and hold the title name to be pasted.
.
5
On the displayed Operation menu screen, touch: Paste extra info
The selected memo is pasted into the schedule.
•
A maximum of 20 memos can be pasted into the schedule.
• Memos can also be pasted. On the Event Description screen, touch: +Add
Memos created by the corresponding applications can be registered. |
1
Start the application as follows. Press the MENU button, and touch: App List
2
Hold the title name of the memo to be pasted.
3
On the displayed Operation menu screen, touch: Register extra info
4
Select the memo to register, and touch: Register.
•
A maximum of 20 memos can be registered to a memo.
• A memo cannot be registered in TODO text.
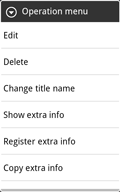
1
Depress the title name of either schedule or memo, and touch: Show extra info on the Operation menu screen displayed.
A list of extra information registered to memos is displayed.
2
Touch the title name of the memo from the list.
The memo Contents are displayed.
For Voice memo, touching Play replays the voice message.
Depressing the icon at the left side of title on the extra information list changes to Move mode, from which you can switch the order of the displayed items.
|
The Monthly screen, Weekly screen, Daily screen, and
TODO list can be arranged on the desktop by registering them as a Widget. |
Monthly |
Displays the Monthly screen of the current month. |
 |
Weekly |
Displays the Weekly screen of the current week. |
|
Daily |
Displays the Daily screen of today. |
 |
TODO list |
Displays the planned TODO, the due date of which is approaching. |
Each Widget can be customized for its display. To customize, touch on either Monthly, Weekly or Daily screen: Menu > Setting > Widget setting.
|
Here explains how to back up all the application data relating to Schedule Street to the SD card. |
|
This backup function backs up the data which the application manages. But some data including text/photo/voice memo or Google Calendar/Tasks are not backed up. The linkage information will be saved. But it will be not restored if the source data of linkage is updated or deleted. We reccomended you do not change the data such as Google cale dar between you back up and restore. |
1
On the Calendar screen, press the Menu button and touch: Setting > Database Backup or Restoration.
2
Touch: Backup.
3
Operate according to instructions on the screen.
Backup data for the Schedule Street can be restored from the SD card. |
|
This restore function restores the data which the application manages. But some data including text/photo/voice memo or Google Calendar/Tasks are not restored up. The linkage information will be restored. But it will be not restored if the source data of linkage is updated or deleted. In addition, the all data will be erased when the data will be restored. |
1
On the Calendar screen, press the Menu button and touch: Setting > Database Backup or Restoration.
2
Touch: Restore.
3
Operate according to instructions on the screen.