
Compliant model: M-IT10UR, M-IT11UR
This manual describes the important precautions you should take for safe operation of this product.
Observe these precautions carefully to avoid personal injury, damage, fire, and other problems.
Meaning of symbols
WARNING
Failure to observe precautions carries the possibility of serious personal injury or death due to fire, electric shock, or other causes.
CAUTION
Failure to observe precautions may result in personal injury due to electric shock or other causes, and may damage other equipment.
Prohibited action
Mandatory action
Situation that needs attention
Notes and reference information
If a foreign object (water, metal chips) enters this product, stop using immediately and remove it from the connected device.
Continuing to use the product as it is may cause a fire or electric shock.
If the product is working abnormally, such as heating up, generating smoke, or giving off a strange smell, stop using it immediately and shut down the connected device. After verifying that the product has cooled down and will not cause burns, remove the batteries from this product.
Afterwards, please contact your dealer.
Continuing to use the product as it is may cause a fire or electric shock.
Please do not drop or hit this product.
If this product is damaged, stop using it immediately and remove this product from the connected device. Afterwards, please contact your dealer.
Fires or electric shocks may occur if this product is used when damaged.
Do not attempt to disassemble, modify or repair this product.
Doing so may cause a fire, electric shock, or product damage.
Malfunctions are not covered under warranty.
Do not put this product in fire.
Ruptures may cause fire or injury.
Please do not remove or connect the USB connector with wet hands. In addition, do not modify or forcibly bend the product.
It can cause a fire or electric shock.
Do not place this product in any of the following environments:
This product does not have a waterproof structure. Use or store in a place not exposed to liquids such as water.
Any liquid such as rain, water spray, juice, coffee, steam, and sweat, may cause this product to breakdown.
Cleaning this product
If the body of this product becomes dirty, wipe it with a soft, dry cloth.
Using a volatile liquid such as paint thinner, benzene or alcohol may affect the material quality and/or discolor this product.
Please note the following for disinfection.
Gently soak a cleaning cloth, such as a microfiber cloth, in the disinfectant solution. Make sure there are no loose droplets and gently wipe the product using the cloth.
After wiping, dry thoroughly and wipe off any residual liquid.
* Do not spray any liquid onto the product directly. Doing so can cause electric malfunctions.
Do not spray any liquid onto the product directly.
Doing so can cause electric malfunctions.
Do not use organic solvents or ultraviolet lights.
Usage can result in deterioration of the housing components or paints, which can cause damage to the exterior.
We recommend the usage of disposable gloves.
Please unplug the USB connector from the PC.
When using any alcohol-based products, please check that it is appropriate for the specific purpose and that it is used properly.
Please note that in the event that damage or abnormal operation to the product is caused by the cleaning process, the customer will be fully responsible for the cost of repair.
We recommend that you disinfect your hands before and after using PCs and peripheral devices that are used by multiple people in order to prevent the spread of infection through the equipment.
Please turn off any connected devices.
* Please turn off connected devices when in sleep or hibernation mode.
* Please unplug the AC adapter and power cable from the power outlet.
The following are included in this package. Verify the package to ensure all items are accounted for prior to using this product. While every effort has been made to ensure proper packaging, in the event that any shortage or damage is discovered, please contact the retailer where the product was purchased.
Main unit
Consumables
The trackball comes pre-installed with the ball and support units.
Trackball
① Left button
To left click on your PC.
② Right button
To right click on your PC.
③ Wheel
Rotate forward and backward or click like a button to operate your PC.
④ “Back” button
Performs the “Back” function on the Web browser.
⑤ “Forward” button
Performs the “Forward” function on the Web browser.
You will need to install the “ELECOM Mouse Assistant Mac version” from our website to use the “Back” and “Forward” button on Mac. Refer to “Install ELECOM Mouse Assistant”.
⑥ Ball (36mm)
Rotate using your fingertips to move the cursor.
Separately sold ball
⑦ Support parts (bearings)
Support the ball.
Support parts are consumables. Compatible support parts can be purchased separately to replace existing support parts.
Optional Parts
⑧ Optical sensor (under the ball)
This sensor will detect the trackball’s movements when you move the trackball.
⑨ Ball removal hole
Push the ball out from here to clean the support parts in the housing.
* See "How to clean the trackball" for details.
⑩ USB connector (male)
Connects to the PC USB-A port
Removal tool
* See "How to replace support parts" for details.
Connecting to a PC
1) Start up a PC.
Please wait until your PC has started up and can be operated.
2) Plug the USB connector into the USB-A port on a PC.
You may use any USB-A port.
To remove the trackball
This product supports hot plugging. The trackball may be removed while your PC is in operation.
3) The driver is automatically installed and the trackball can be used.
You can now use the trackball.
By downloading and installing the "ELECOM Mouse Assistant" from our company website, functions such as button assignment function and presentation mode can be used. Please proceed to “Install ELECOM Mouse Assistant”.
Change the mouse pointer speed
Adjust the mouse pointer movement speed on your PC if the mouse pointer moves too fast or too slow.
■ For Windows 11
1) Click on “Start” on the bottom of the screen and click on “Settings”.
The “Settings” page will appear.
2) Click on “Bluetooth & devices” and then “Mouse”.
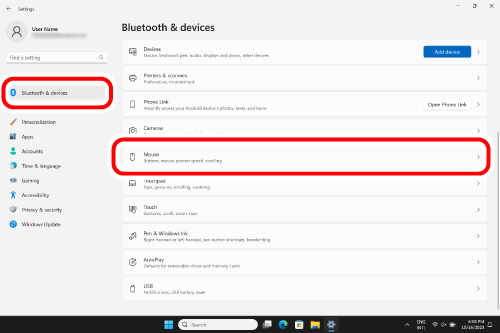
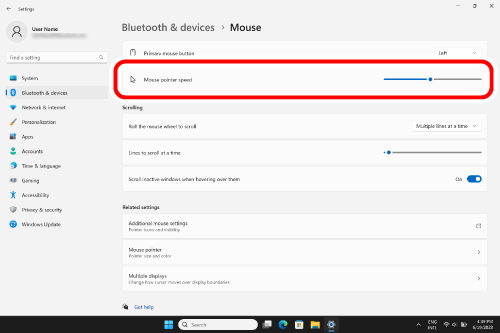
3) Adjust the “Mouse pointer speed” slider bar to adjust the mouse pointer movement speed.
■ For Windows 10
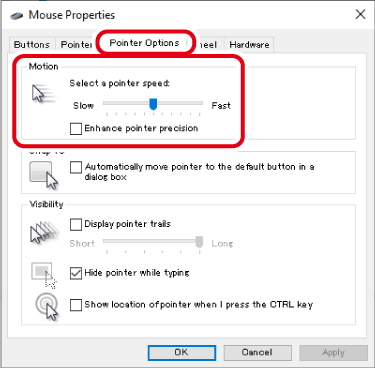
1) Open “Mouse” properties.
From the start menu, click the Settings icon, select “Devices” → “Mouse”, then click “Additional mouse options” under “Related Settings”.
2) Select the “Pointer Options” tab.
3) Adjust the “Select a pointer speed” slider bar to adjust the mouse pointer movement speed.
Change the number of lines scrolled in one wheel turn
■ For Windows 11
1) Click on “Start” on the bottom of the screen and click on “Settings”.
The “Settings” page will appear.
2) Click on “Bluetooth & devices” and then “Mouse”.

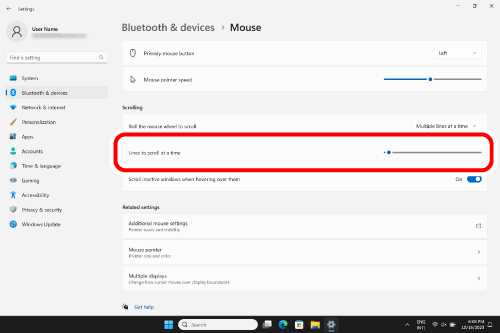
3) Adjust the “Lines to scroll at a time” slider bar to adjust the number of lines per scroll.
■ For Windows 10
1) Open “Mouse” properties.
From the start menu, click the Settings icon, select “Devices” → “Mouse”, then click “Additional mouse options” under “Related Settings”.
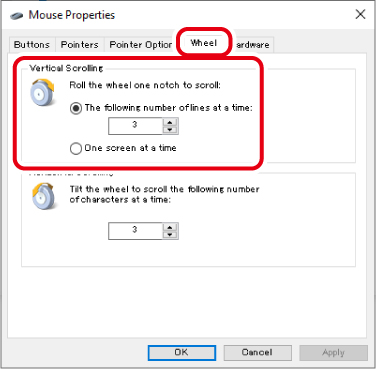
2) Select the “Wheel” tab.
3) Change the value of “The following number of lines at a time” under “Roll the wheel one notch to scroll”
Connecting to a PC
1) Start up a PC.
Please wait until your PC has started up and can be operated.
2) Plug the USB connector into the USB-A port on a PC.
You may use any USB-A port.
To remove the trackball
This product supports hot plugging. The trackball may be removed while your PC is in operation.
3) The driver is automatically installed and the trackball can be used.
You can now use the trackball.
By downloading and installing the "ELECOM Mouse Assistant" from our company website, functions such as button assignment function and presentation mode can be used. Please proceed to “Install ELECOM Mouse Assistant”.
Change the mouse pointer speed
Adjust the mouse pointer movement speed on your PC if the mouse pointer moves too fast or too slow.
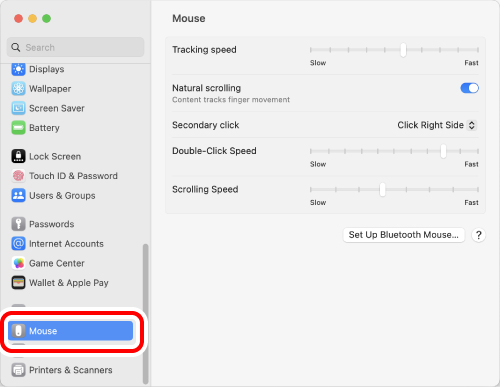
1) Click “Mouse” under “System Settings”.
The “Mouse” settings page will load up.
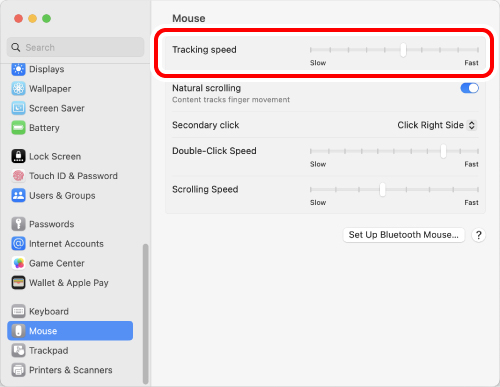
2) Adjust the “Tracking speed” slider to adjust the speed of the mouse pointer.
Unchecking “Natural scrolling” will cause the scroll direction to be reversed.
Connecting to a PC
1) Start up a PC.
Please wait until your PC has started up and can be operated.
2) Plug the USB connector into the USB-A port on a PC.
You may use any USB-A port.
To remove the trackball
This product supports hot plugging. The trackball may be removed while your PC is in operation.
3) The driver is automatically installed and the trackball can be used.
You can now use this product.
Change the mouse pointer speed
Adjust the mouse pointer movement speed on your PC if the mouse pointer moves too fast or too slow.
1) Click on the battery icon at the bottom right.
2) Click on ![]() (settings) on the Quick Settings panel.
(settings) on the Quick Settings panel.
The settings page will appear.
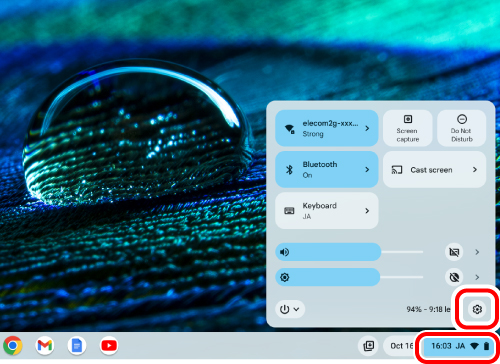
3) Click on “Mouse and touchpad” under “Device”.
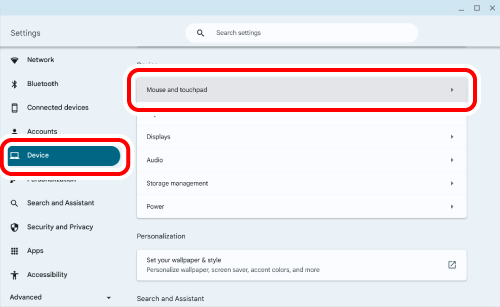
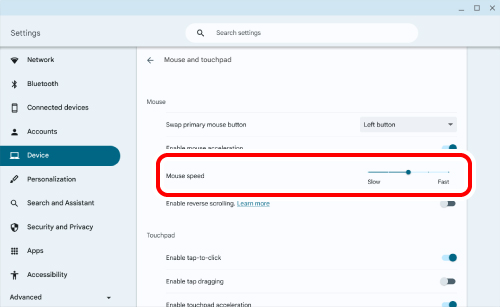
4) Adjust the “Mouse speed” slider to adjust the speed of the mouse pointer.
To use the function assignment function and presentation mode with this product, the ELECOM Mouse Assistant must be installed.
“ELECOM Mouse Assistant” is a software that allows you to use the mouse more effectively.
Using ELECOM Mouse Assistant, users can set the functions they want to the unique buttons and use them to perform the operations they want.
■ Get ELECOM Mouse Assistant
Please visit our homepage below and download the latest version of the application.
> The download page is here
| Connector type | USB Type-A plug |
|---|---|
| Connection method | USB-A wired |
| Compatible models | USB port-equipped Windows OS, macOS, and ChromeOS devices |
| Supported OS | Windows 11/10, macOS Ventura 13 and ChromeOS * Update for each new version of the OS or the installation of a service pack might be required. * Compatibility information was retrieved during operation confirmation in our verification environment. There is no guarantee of full compatibility with all devices, OS versions and applications. |
| Sensor Resolution | 500 DPI |
| Sensor type | IR LED |
| Light beam type | Infra-red light |
| Buttons | 5 * including wheel button |
| Number of wheels | 1 |
| Power source | USB bus power |
| Cable length | Approximately 1.5 m / 4.9 ft. |
| Size category | XL size |
| Dimensions | Approximately width 96 mm × length 126 mm × height 52 mm / width 3.8 in. × length 5.0 in. × height 2.0 in. |
| Weight | Approximately 175 g / 6.2 oz *including cable |
| Operating environment conditions | Temperature: 5 ℃ to 40 ℃ / 41 ℉ to 104 ℉, humidity: 90 % RH (without condensation) |
| Storage environment conditions | Temperature: -10 ℃ to 60 ℃ / 14 ℉ to 140 ℉, humidity: 90 % RH (without condensation) |
| Accessories | Removal tool × 1 |
| VCCI | Supports ClassB |
Do not spray any liquid onto the product directly.
Doing so can cause electric malfunctions.
Never apply hot water.
Doing so can cause electric malfunctions.
Do not use organic solvents or ultraviolet lights.
Usage can result in deterioration of the housing components or paints, which can cause damage to the exterior.
We recommend the usage of disposable gloves.
Please unplug the USB connector from this product and the PC.
When using any alcohol-based products, please check that it is appropriate for the specific purpose and that it is used properly.
Please note that in the event that damage or abnormal operation to the product is caused by the cleaning process, the customer will be fully responsible for the cost of repair.
We recommend that you disinfect your hands before and after using PCs and peripheral devices that are used by multiple people in order to prevent the spread of infection through the equipment.
Gently soak a cleaning cloth, such as a microfiber cloth, in the disinfectant solution. Make sure there are no loose droplets and gently wipe the product using the cloth.
After wiping, dry thoroughly and wipe off any residual liquid.
* Do not spray any liquid onto the product directly. Doing so can cause electric malfunctions.
1) Use a finger (or a pen) to push the ball out from the under side.
2) Use a cotton bud or something similar to clean off the dust accumulated on the contact surfaces of the three support parts.
When cleaning around the optical sensor, take care not to damage the sensor.
3) Gently wipe off the dirt on the ball with a tissue.
Do not use alcohol, cleaning cloths and other such cleaning tools when cleaning the ball.
Cleaning will remove the pre-applied coat of oil on the ball's surface and cause the ball to function poorly.
4) Insert the ball into the trackball housing.
Inadequate oil on the surface of the ball may cause the ball to function poorly.
If the ball seems to function poorly, rub it in your hand for around 30 seconds.
The oil from your hand will improve how the ball functions.
When replacing the support parts, take care not to damage the sensor.
1) Use a finger (or a pen) to push the ball out from the under side.
2) Hold onto the included removal tool with your fingers and push it into the notch on the sides of the support part until you hear a click.
3) Pull the removal tool hard to remove the support part.
4) Fit the replacement support part into the inner catch.
5) Press the support part in with your finger until you hear a click.
6) Insert the ball into the trackball housing.
Try the following if the trackball operates abnormally.
① Please restart the connected device.
This product may become unstable depending on the condition of the connected device. Please restart the connected device.
② Please uninstall mouse drivers and configuration utilities other than this product for connected devices.
If you used the manufacturer's original driver or configuration utility for the trackball you were using before this product, please uninstall them in advance.
If third-party drivers are installed, this product may not work properly.
For instructions on how to uninstall, please refer to the instruction manual for your mouse that you have been using until now.
③ Update the OS of the connected device to the latest version.
If the OS version of the connected device is outdated, the trackball may become unstable. Please update to the latest version.
④ Check the energy saving settings on the connected device. (When using Windows® PC)
On Windows, in order to reduce power consumption depending on the PC, the power of the USB-connected product is set to turn off automatically.
You can change the settings in the following ways:
For Windows 11
1) Click the “Start” button at the bottom of the screen.

2) Click ”All apps”.
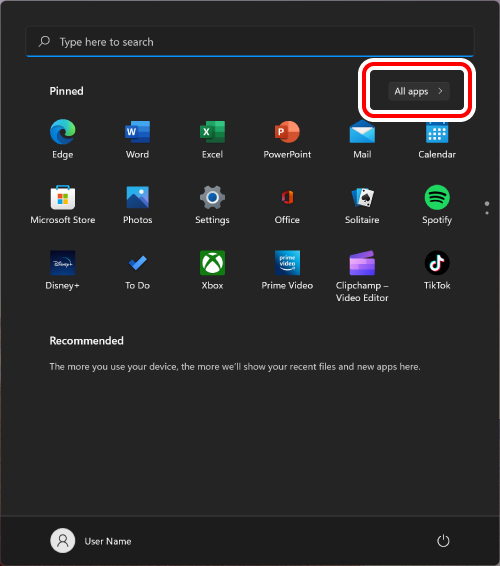
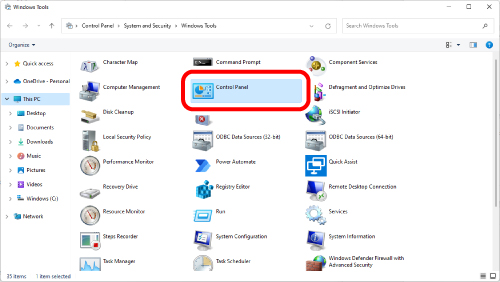
3) Click ”Windows Tools”.
The ”Windows Tools” screen will appear.
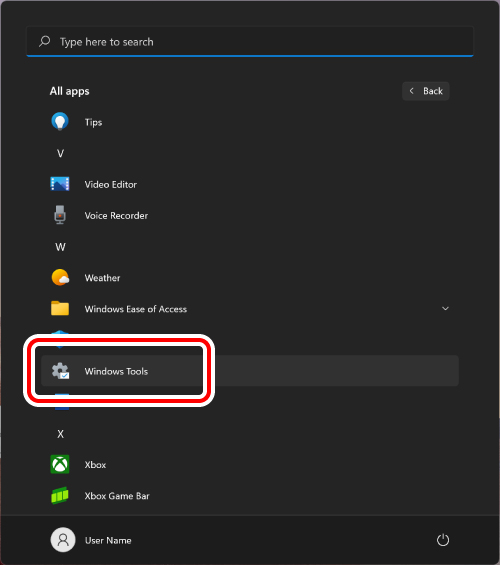
4) Double-click ”Control Panel”.
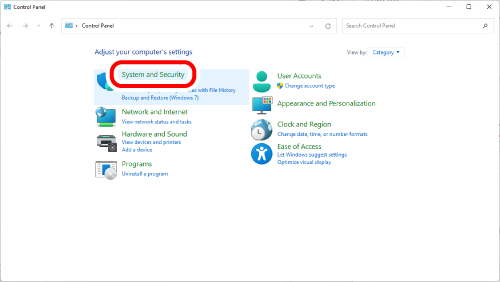
5) Click ”System and Security”.
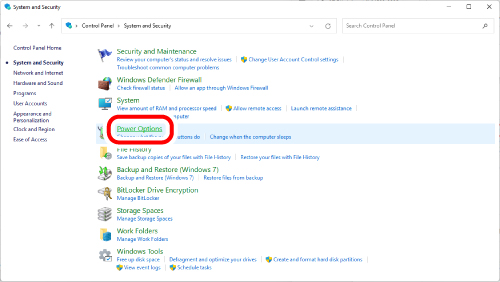
6) Click ”Power Options”.
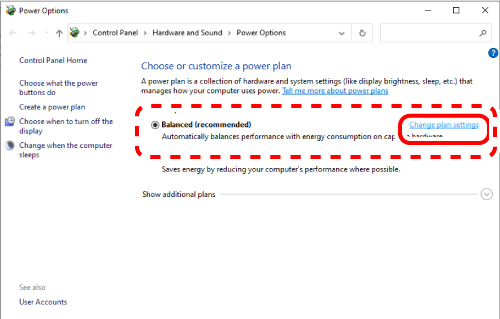
7) Click "Change plan settings" to the right of the item selected in "Power Plan".
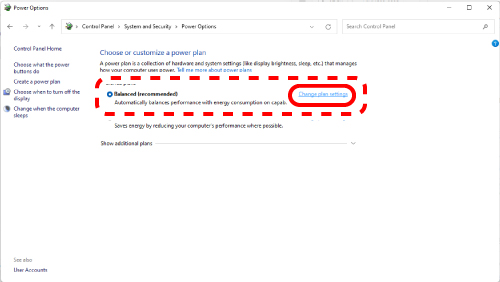
8) On the ”Edit Plan Settings” screen, click “Change advanced power settings”.
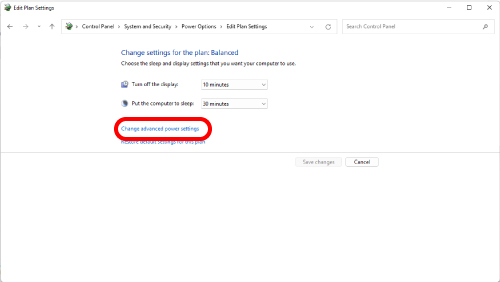
9) On the ”Power Options” screen, click the ”+” mark in ”USB settings” from the list, and then click the ”+” mark in ”USB selective suspend setting”.
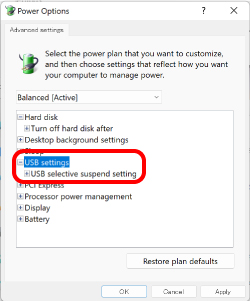
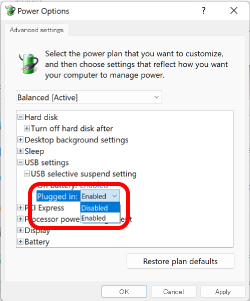
10) In the drop box next to ”Setting”, select ”Disabled”.
If you are using a laptop, there are two items instead of “Settings”: “On battery” and “Plugged in”. In that case, please set the “Plugged in” setting to “Disabled”.
11) Click "OK" to confirm the settings.
12) Click the “×” (close) in the upper right corner to close “Edit Plan Settings”.
1) Right-click the Start button at the bottom left of the screen, click “Power Options”, and then click “Additional power settings” under “Related settings” on the right side of the “Power & sleep” screen.
2) Click “Change plan settings” on the right side of the item selected in “Power Plan”.
3) On the “Edit Plan Settings” screen, click “Change advanced power settings”.
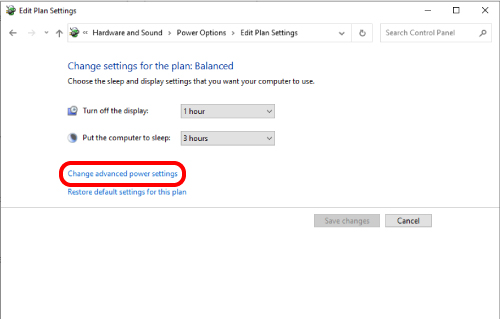
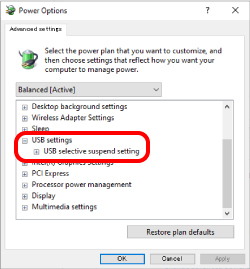
4) On the “Power Options” screen, click the “+” mark in “USB settings” from the list, and then click the “+” mark in “USB selective suspend setting”.
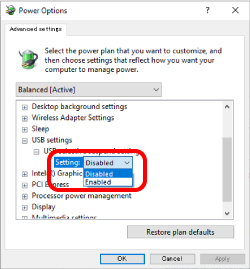
5) In the drop box next to “Setting”, select “Disabled”.
If you are using a laptop, there are two items instead of “Settings”: “On battery” and “Plugged in”. In that case, please set the “Plugged in” setting to “Disabled”.
6) Click “OK” to confirm the settings.
7) Click the “×” (close) in the upper right corner to close “Edit Plan Settings”.