![]()
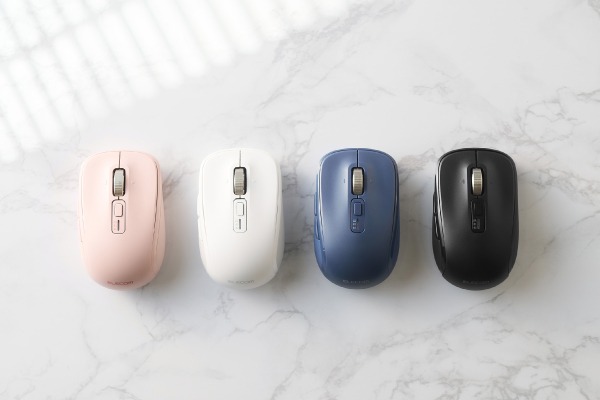
Compliant model: M-MY50MBS, E01H
Mouse

① Left button
To left-click on your PC.
② Right button
To right-click on your PC.
③ Fast smart scroll and horizontal scroll
Rotate the wheel forward and backward or click it like a button to operate your PC.


You will need to install “ELECOM Mouse Assistant 6” from our website to use the horizontal scrolling function on Windows. Refer to “Install ELECOM Mouse Assistant 6”.
④ “Back” button
To perform the “Back” function on the Web browser.
⑤ “Forward” button
To perform the “Forward” function on the Web browser.

You will need to install “ELECOM Mouse Assistant 6” from our website to use the “Back” and “Forward” buttons on Mac. Refer to “Install ELECOM Mouse Assistant 6”.
⑥ Function button
You can assign a function to this button. By default, no function is assigned.
You will need to install “ELECOM Mouse Assistant 6” from our website to assign a function to this button. Refer to “Install ELECOM Mouse Assistant 6”.
⑦ Connected device switching button
⑧ Connected device light
Bluetooth connection ![]() or
or ![]() : Blue
: Blue
2.4 GHz wireless connection ![]() : White
: White
⑨ Battery cover
Remove this cover to insert a battery.
⑩ Battery compartment
This compartment holds the battery.
⑪ Receiver storage compartment
The receiver can be stored here when 2.4 GHz wireless connection is not used.

⑫ Battery insulating tab
Remove this tab before use.
⑬ Power switch
Use this switch to turn the mouse on and off.
⑭ Optical sensor
This sensor illuminates in blue when the mouse is turned on.
This sensor detects mouse movements when you move the mouse.
* Note that looking directly into the sensor light may hurt your eyes.
Receiver

⑮ USB-A plug
Use this plug to connect to the PC’s USB-A port.
Switching the connected device
This product can be used by switching between two Bluetooth devices and one 2.4 GHz wireless connection.
Change the device connection as follows.
1) Press the connected device switching button to change the connection.
The connected device light operates in blue when the connected device is ![]() or
or ![]() , and in white when
, and in white when ![]() is selected.
is selected.
![]() and
and ![]() are Bluetooth connections, and
are Bluetooth connections, and ![]() is 2.4 GHz wireless connection.
is 2.4 GHz wireless connection.

If the mouse is not paired with either ![]() or
or ![]() during Bluetooth connection, the current connection will be lost if the device is switched to the unpaired one.
during Bluetooth connection, the current connection will be lost if the device is switched to the unpaired one.
Switching back to the current connection resumes the connection.
For details on the pairing procedure, refer to “How to use” -> “Connecting and setting up the mouse” -> (for each OS) -> “3. Pair with a PC”.
1. Remove the battery insulating tab.
1) Remove the battery cover.

2) Pull out the battery insulating tab slowly while holding the battery.

3) Put the battery cover back on.

When replacing the battery...
1) Remove the battery cover.

2) Remove the battery.

3) Insert a new battery as indicated on the bottom of the battery compartment.

Ensure that the battery is inserted with the positive (+) and negative (-) terminals oriented correctly.
4) Put the battery cover back on.

2. Turn the power on.
1) Slide the power switch on the bottom to the ON position.

The connected device light turns on for three seconds.
* When the battery level is low, the connected device light selected by the connected device switching button flashes for five seconds.
Power-saving mode
When the mouse is left untouched for a certain period of time while the power is on, it automatically enters power-saving mode.
The mouse returns from power-saving mode when it is moved.
* Mouse operation may be unstable for two to three seconds after returning from the power-saving mode.
3. Pair with a PC.
When using Swift Pair
This product supports Swift Pair. If you are using a PC or Bluetooth dongle that supports Swift Pair, setting the mouse to pairing mode allows it to quickly pair with the PC.
1) Use the connected device switching button to select ![]() or
or ![]() .
.
When there is no device that can be connected, such as when the mouse is initially started or after a reset
The mouse enters pairing mode, and the connected device light flashes blue rapidly.
Proceed to Step 3.
2) Press the connected device switching button for three seconds and release it.
The mouse enters pairing mode, and the connected device light flashes blue rapidly.

3) When the screen below appears in the lower-right corner, click “Connect”.
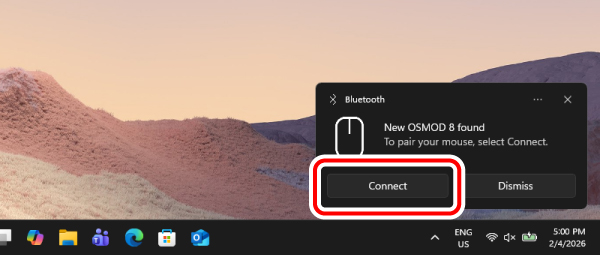
If the above screen does not appear, check whether Swift Pair notifications are enabled. For more details, refer to “Turning on Swift Pair notifications”.
4) When “OSMOD 8 connected” is displayed, pairing is complete.
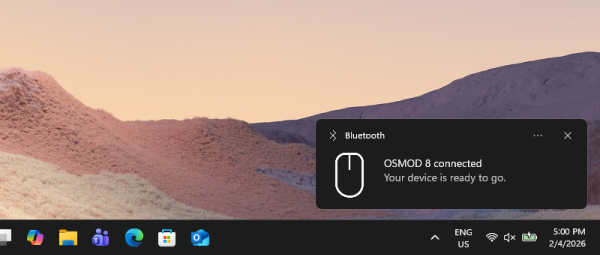
The connected device light on the top turns on for three seconds and then turns off.
You can now use the mouse.
● Turning on Swift Pair notifications
If Swift Pair does not work even after entering pairing mode, enable the Swift Pair notification by following the steps below.
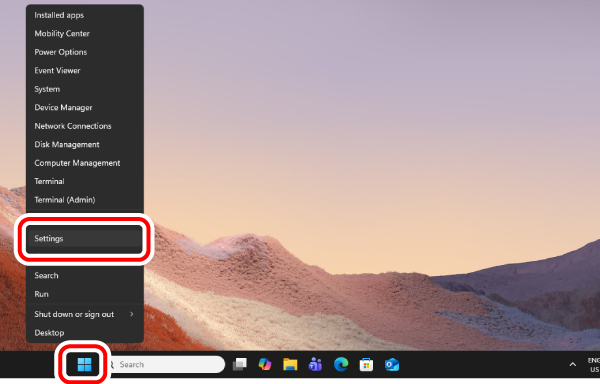
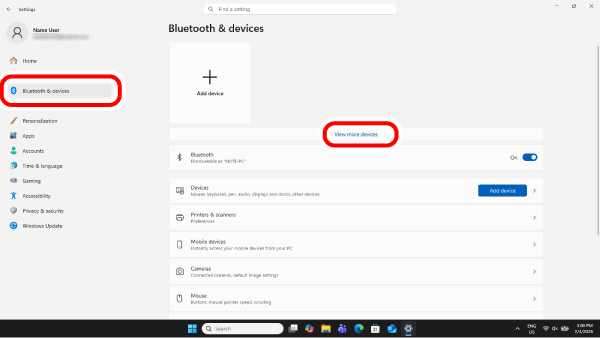
1) Right-click “Start” at the bottom of the screen and then click “Settings”.
The “Settings” screen appears.
2) Click “Bluetooth & devices” and then click “View more devices”.
3) Click “Show notifications to connect using Swift Pair” to turn it on.
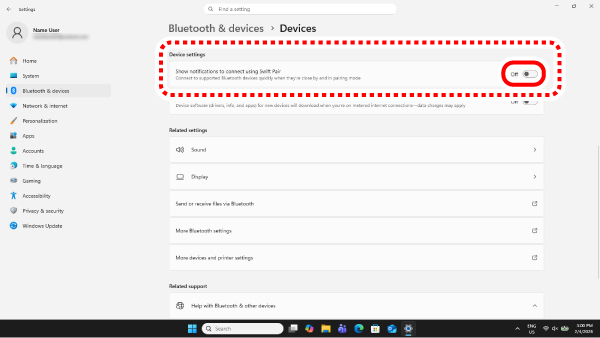
You are now able to use Swift Pair.
If “Show notifications to connect using Swift Pair” does not appear, your PC or Bluetooth dongle does not support Swift Pair. In that case, pair the device from the Settings screen. For details, refer to “■ When pairing from the Settings screen”.
When pairing from the Settings screen
1) Right-click “Start” at the bottom of the screen and then click “Settings”.
The “Settings” screen appears.

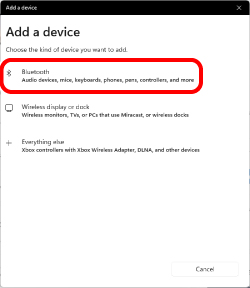
2) On the “Home” page, click “Add device” in the “Bluetooth devices” tile.
The “Add a device” screen appears.
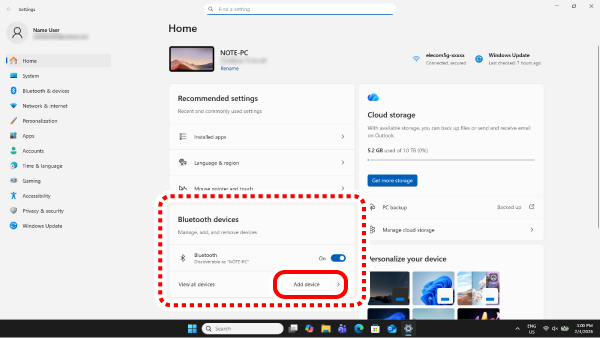
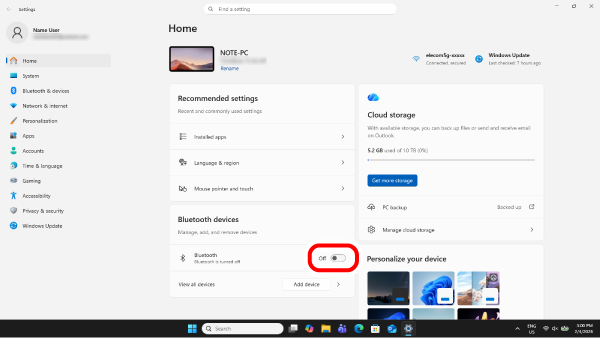
If “Bluetooth” is off, turn it on.
3) Click “Bluetooth”.
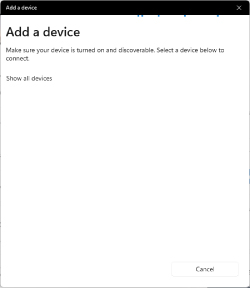
4) When the “Add a device” screen appears, use the connected device switching button to select ![]() or
or ![]() .
.
When there is no device that can be connected, such as when the mouse is initially started or after a reset
The mouse enters pairing mode, and the connected device light flashes blue rapidly. Proceed to Step 6.
5) Press the connected device switching button for three seconds and release it.
The mouse enters pairing mode, and the connected device light flashes blue rapidly.
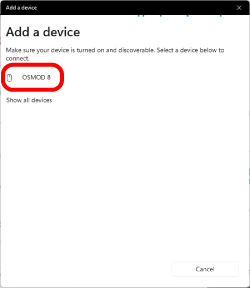
6) Click “OSMOD 8”.
Pairing begins.
7) When the message changes to “Your device is ready to go!”, click “Done”.
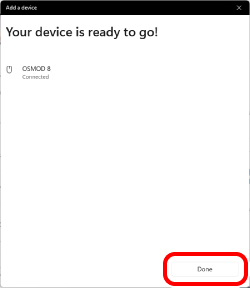
8) Pairing is complete when this product is added to the “Bluetooth devices” tile and the status is “Connected”.
The connected device light turns on for three seconds and then turns off.
You can now use the mouse.
By downloading and installing “ELECOM Mouse Assistant 6” from our website, you can use features such as assigning functions, assigning keyboard commands, assigning gesture functions to the buttons, and switching profiles. Proceed to “Install ELECOM Mouse Assistant 6”.
1. Remove the battery insulating tab.
1) Remove the battery cover.
2) Pull out the battery insulating tab slowly while holding the battery.
3) Put the battery cover back on.
When replacing the battery...
1) Remove the battery cover.
2) Remove the battery.
3) Insert a new battery as indicated on the bottom of the battery compartment.
Ensure that the battery is inserted with the positive (+) and negative (-) terminals oriented correctly.
4) Put the battery cover back on.
2. Turn the power on.
1) Slide the power switch on the bottom to the ON position.
The connected device light turns on for three seconds.
* When the battery level is low, the connected device light selected by the connected device switching button flashes for five seconds.
Power-saving mode
When the mouse is left untouched for a certain period of time while the power is on, it automatically enters power-saving mode.
The mouse returns from power-saving mode when it is moved.
* Mouse operation may be unstable for two to three seconds after returning from the power-saving mode.
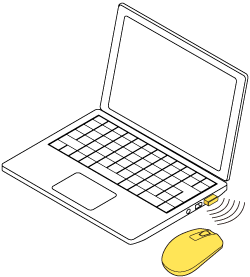
3. Connect to a PC.
1) Start up your PC.
Wait until the PC has started up and can be operated.
2) Use the connected device switching button to select ![]() .
.
The connected device light turns on white for three seconds.
For details on selecting the connected device, refer to “Switching the connected device”.
3) Insert the receiver into the PC’s USB-A port.

You may use any USB-A port.
When removing the receiver
This product supports hot plugging. You can remove the receiver even when the PC is running.
4) The driver will be automatically installed, and you will then be able to use the mouse.
You can now use the mouse.
By downloading and installing “ELECOM Mouse Assistant 6” from our website, you can use features such as assigning functions, assigning keyboard commands, assigning gesture functions to the buttons, and switching profiles. Proceed to “Install ELECOM Mouse Assistant 6”.
Changing the mouse pointer speed
Adjust the mouse pointer movement speed on your PC if the mouse pointer moves too fast or too slow.
■ For Windows 11
* Windows 11 Pro screens are used in the following explanation. The display may be different from other operating systems such as Windows 11 Home.
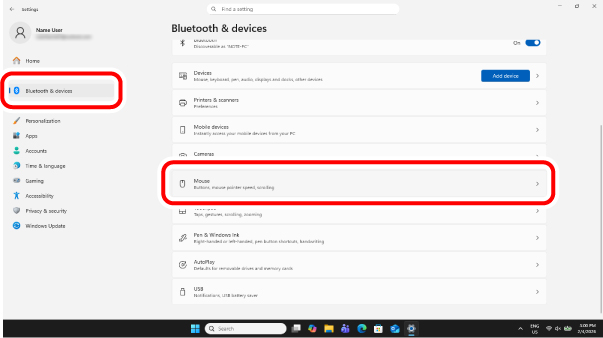
1) Right-click “Start” at the bottom of the screen and then click “Settings”.
The “Settings” page appears.
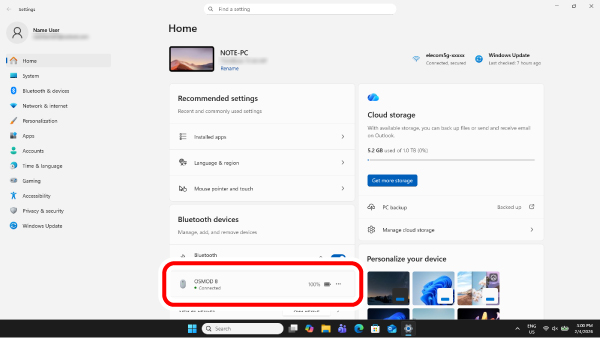
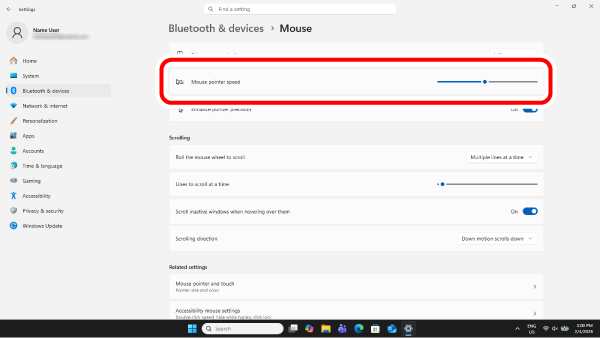
2) Click “Bluetooth & devices” and then “Mouse”.
3) Adjust the “Mouse pointer speed” slider bar to adjust the mouse pointer movement speed.
■ For Windows 10
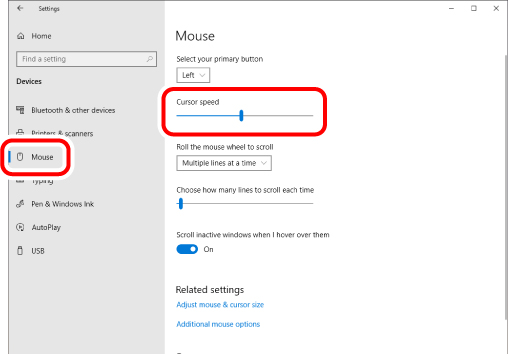
1) Open “Mouse” properties.
From the start menu, click the Settings icon, and click “Devices” -> “Mouse”.
2) Click “Mouse” in the left menu.
3) Adjust the “Cursor speed” slider bar to adjust the mouse pointer movement speed.
Changing the number of lines scrolled per wheel notch
■ For Windows 11
* Windows 11 Pro screens are used in the following explanation. The display may be different from other operating systems such as Windows 11 Home.
1) Right-click “Start” at the bottom of the screen and then click “Settings”.
The “Settings” page appears.
2) Click “Bluetooth & devices” and then “Mouse”.
3) Adjust the “Lines to scroll at a time” slider bar to adjust the number of lines scrolled.

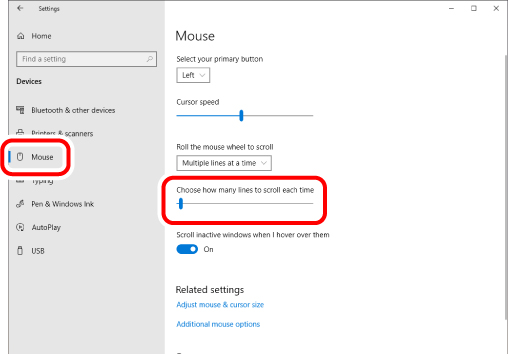
■ For Windows 10
1) Open “Mouse” properties.
From the start menu, click the Settings icon, and click “Devices” -> “Mouse”.
2) Click “Mouse” in the left menu.
3) Adjust the “Choose how many lines to scroll each time” slider bar to adjust the number of lines to scroll per notch of the wheel.
Changing the scroll direction (Windows 11 only)
* Windows 11 Pro screens are used in the following explanation. The display may be different from other operating systems such as Windows 11 Home.
Change the scroll direction for when the scroll wheel on the mouse is moved.
1) Right-click “Start” at the bottom of the screen and then click “Settings”.
The “Settings” page appears.
2) Click “Bluetooth & devices” and then “Mouse”.
3) Use “Scrolling direction” to change the scroll direction.
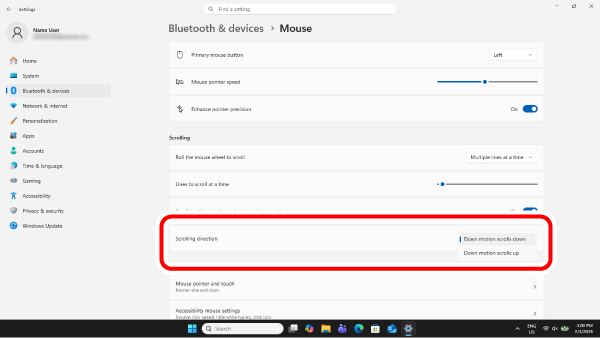
Select “Down motion scrolls up” to reverse the scroll direction when the scroll wheel is moved.
1. Remove the battery insulating tab.
1) Remove the battery cover.
2) Pull out the battery insulating tab slowly while holding the battery.
3) Put the battery cover back on.
When replacing the battery...
1) Remove the battery cover.
2) Remove the battery.
3) Insert a new battery as indicated on the bottom of the battery compartment.
Ensure that the battery is inserted with the positive (+) and negative (-) terminals oriented correctly.
4) Put the battery cover back on.
2. Turn the power on.
1) Slide the power switch on the bottom to the ON position.
The connected device light turns on for three seconds.
* When the battery level is low, the connected device light selected by the connected device switching button flashes for five seconds.
Power-saving mode
When the mouse is left untouched for a certain period of time while the power is on, it automatically enters power-saving mode.
The mouse returns from power-saving mode when it is moved.
* Mouse operation may be unstable for two to three seconds after returning from the power-saving mode.
3. Pair with a PC.
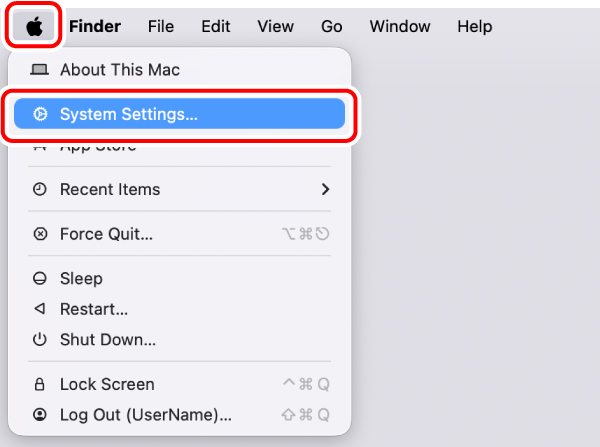
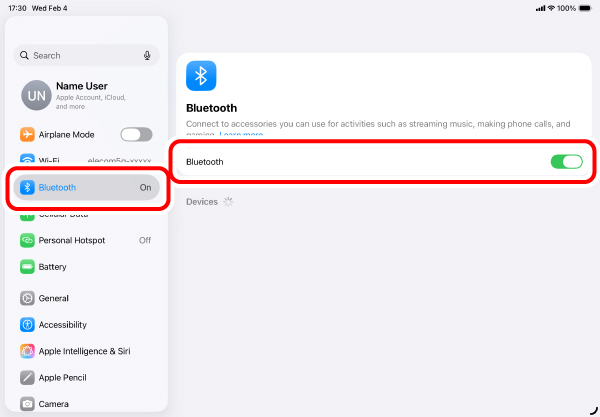
1) From the Apple menu, click “System Settings...”.
The “System Settings” screen appears.
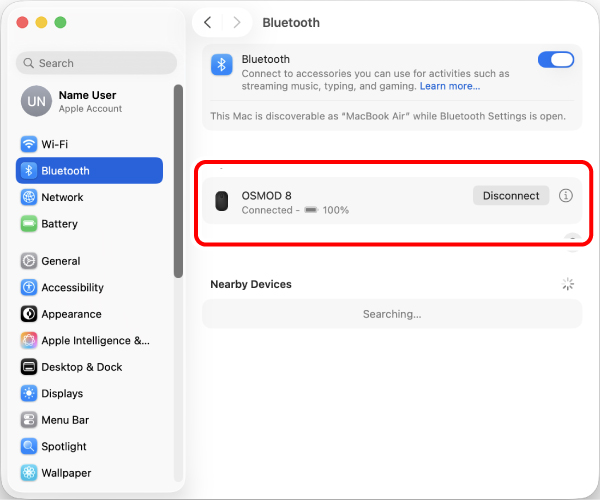
2) Click “Bluetooth” to turn on “Bluetooth”.
The “Bluetooth” settings screen appears.

3) Use the connected device switching button to select ![]() or
or ![]() .
.
When there is no device that can be connected, such as when the mouse is initially started or after a reset
The mouse enters pairing mode, and the connected device light flashes blue rapidly. Proceed to Step 5.
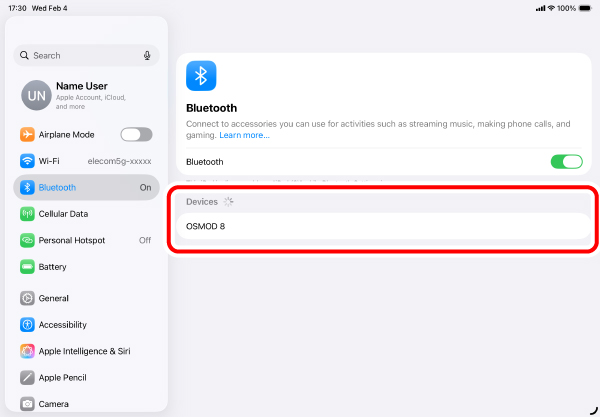
4) While searching for devices, press the connected device switching button for three seconds and release it.
The mouse enters pairing mode, and the connected device light flashes blue rapidly.
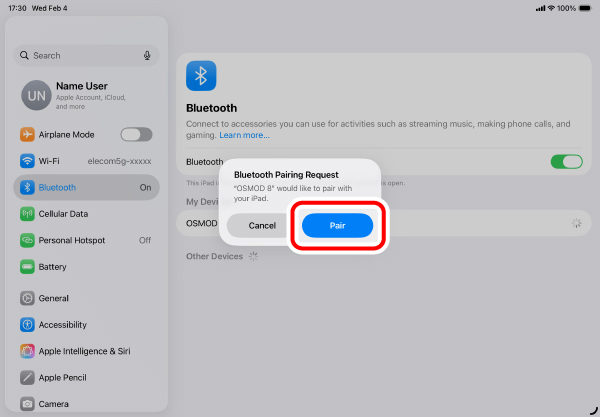
5) When “OSMOD 8” is detected under “Nearby Devices”, click “Connect”.
Pairing begins.

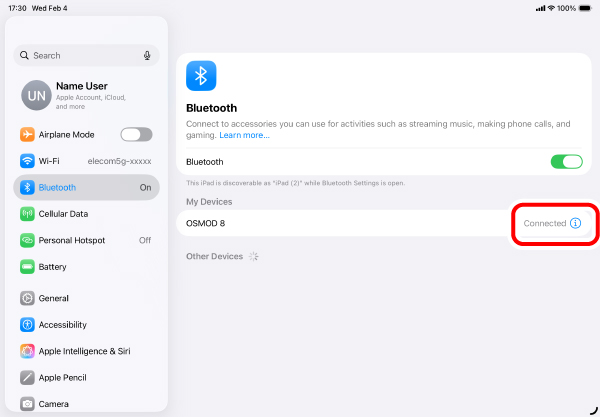
6) When “OSMOD 8” changes to “Connected”, pairing is complete.
The connected device light turns on for three seconds and then turns off.
You can now use the mouse.
By downloading and installing “ELECOM Mouse Assistant 6” from our website, the button assignment functions and presentation mode can be used. Proceed to “Install ELECOM Mouse Assistant 6”.
1. Remove the battery insulating tab.
1) Remove the battery cover.
2) Pull out the battery insulating tab slowly while holding the battery.
3) Put the battery cover back on.
When replacing the battery...
1) Remove the battery cover.
2) Remove the battery.
3) Insert a new battery as indicated on the bottom of the battery compartment.
Ensure that the battery is inserted with the positive (+) and negative (-) terminals oriented correctly.
4) Put the battery cover back on.
2. Turn the power on.
1) Slide the power switch on the bottom to the ON position.
The connected device light turns on for three seconds.
* When the battery level is low, the connected device light selected by the connected device switching button flashes for five seconds.
Power-saving mode
When the mouse is left untouched for a certain period of time while the power is on, it automatically enters power-saving mode.
The mouse returns from power-saving mode when it is moved.
* Mouse operation may be unstable for two to three seconds after returning from the power-saving mode.
3. Connect to a PC.
1) Start up your PC.
Wait until the PC has started up and can be operated.
2) Use the connected device switching button to select ![]() .
.
The connected device light turns on white for three seconds.
For details on selecting the connected device, refer to “Switching the connected device”.
3) Insert the receiver into the PC’s USB-A port.
You may use any USB-A port.

When removing the receiver
This product supports hot plugging. You can remove the receiver even when the PC is running.
4) The driver will be automatically installed, and you will then be able to use the mouse.
You can now use the mouse.
By downloading and installing “ELECOM Mouse Assistant 6” from our website, the button assignment functions and presentation mode can be used. Proceed to “Install ELECOM Mouse Assistant 6”.
Changing the mouse pointer speed
Adjust the mouse pointer movement speed on your PC if the mouse pointer moves too fast or too slow.
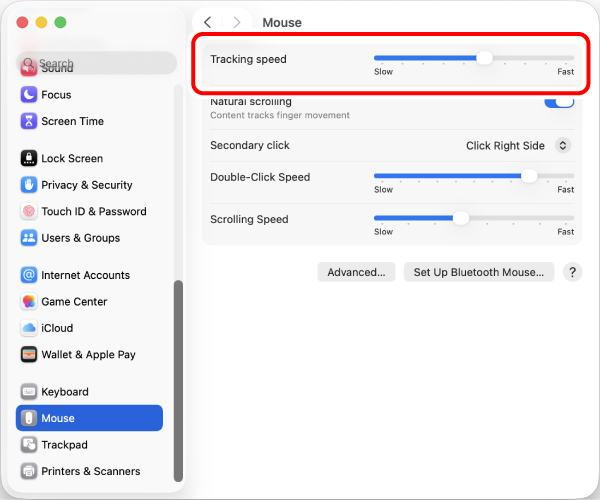
1) Click “Mouse” under “System Settings”.
The “Mouse” settings page loads.
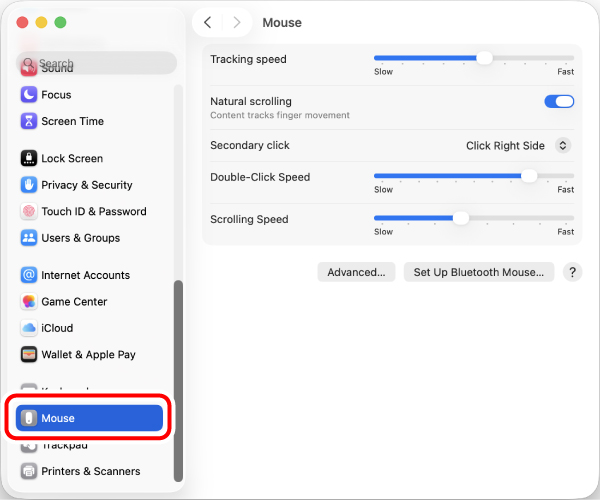
2) Adjust the “Tracking speed” slider to adjust the mouse pointer speed.
Changing the scroll direction
Change the scroll direction for when the scroll wheel on the mouse is moved.
1) Click “Mouse” under “System Settings”.
The “Mouse” settings page loads.
2) Clicking “Natural scrolling” to turn it on or off will change the scroll direction.
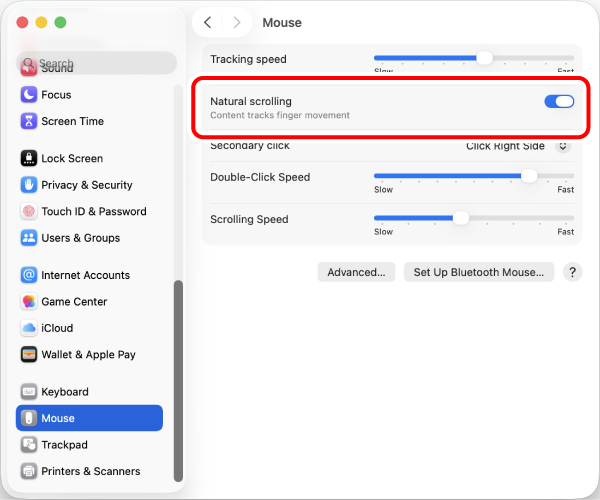
When “Natural scrolling” is turned off, the scroll direction will be the same as the direction of the wheel movement.
1. Remove the battery insulating tab.
1) Remove the battery cover.
2) Pull out the battery insulating tab slowly while holding the battery.
3) Put the battery cover back on.
When replacing the battery...
1) Remove the battery cover.
2) Remove the battery.
3) Insert a new battery as indicated on the bottom of the battery compartment.
Ensure that the battery is inserted with the positive (+) and negative (-) terminals oriented correctly.
4) Put the battery cover back on.
2. Turn the power on.
1) Slide the power switch on the bottom to the ON position.
The connected device light turns on for three seconds.
* When the battery level is low, the connected device light selected by the connected device switching button flashes for five seconds.
Power-saving mode
When the mouse is left untouched for a certain period of time while the power is on, it automatically enters power-saving mode.
The mouse returns from power-saving mode when it is moved.
* Mouse operation may be unstable for two to three seconds after returning from the power-saving mode.
3. Pair with an iPad or iPhone.
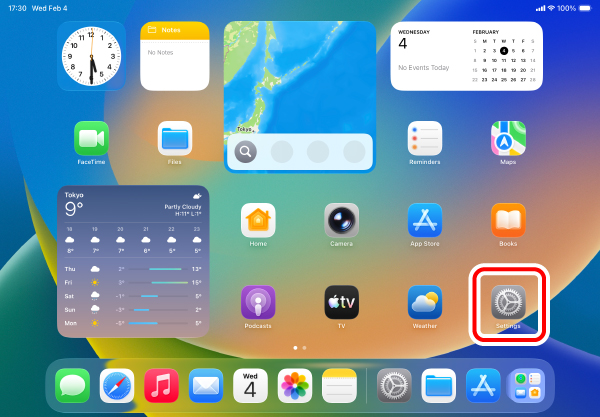
1) Tap “Settings” from the Home screen.
2) Tap “Bluetooth” to turn on “Bluetooth”.
3) Use the connected device switching button to select ![]() or
or ![]() .
.
When there is no device that can be connected, such as when the mouse is initially started or after a reset
The mouse enters pairing mode, and the connected device light flashes blue rapidly. Proceed to Step 5.
4) While searching for devices, press the connected device switching button for three seconds and release it.
The mouse enters pairing mode, and the connected device light flashes blue rapidly.
5) Tap “OSMOD 8” when it is detected under “Devices”.
Pairing begins.
6) When the “Bluetooth Pairing Request” screen loads, tap “Pair”.
7) You can use the mouse when the status shows “Connected”.
The connected device light turns on for three seconds and then turns off.
You can now use the mouse.
Registering custom actions to the buttons
Only the following two buttons and the wheel can be used by default.
Follow the steps below to assign all other button functions.
1. Turn on AssistiveTouch.
1) Tap “Accessibility” under “Settings”.
2) Tap “Touch” under “Physical and Motor”.

3) Tap “AssistiveTouch”.
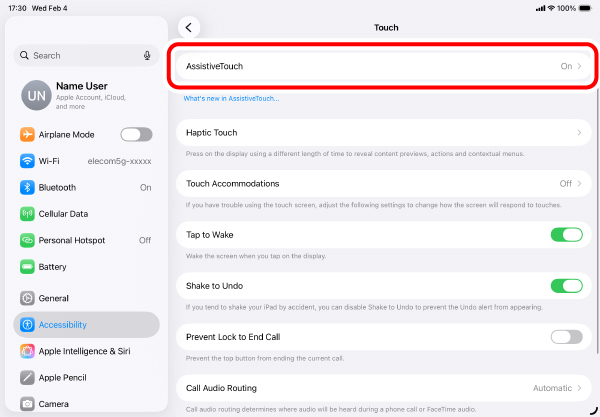
4) Tap “AssistiveTouch” to turn it on.
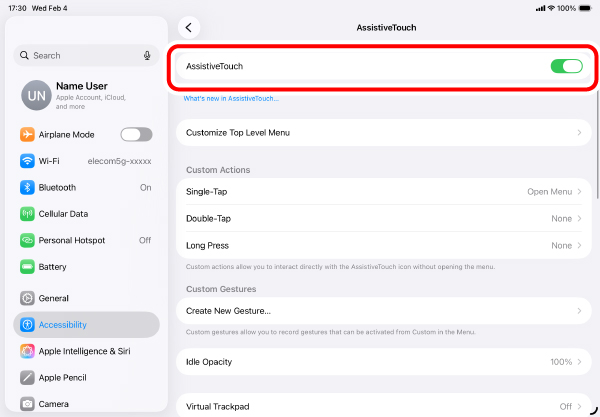
2. Assign custom actions to the buttons.
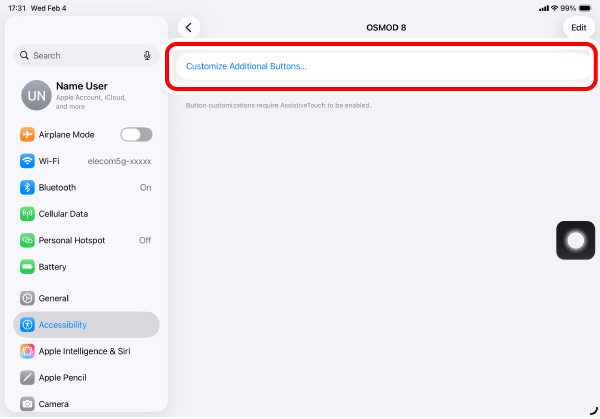
1) Tap “Devices” under “Pointer Devices”.
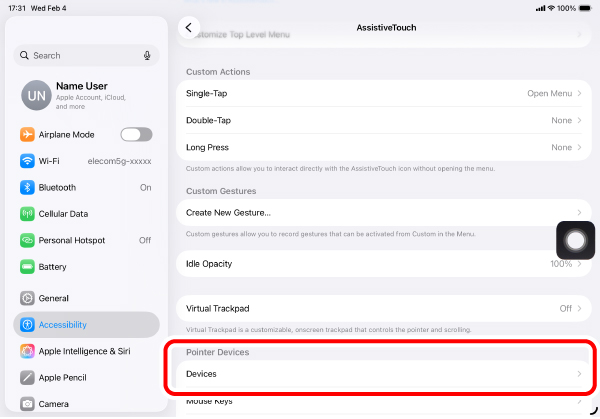
2) Tap “OSMOD 8” under “Connected Devices”.
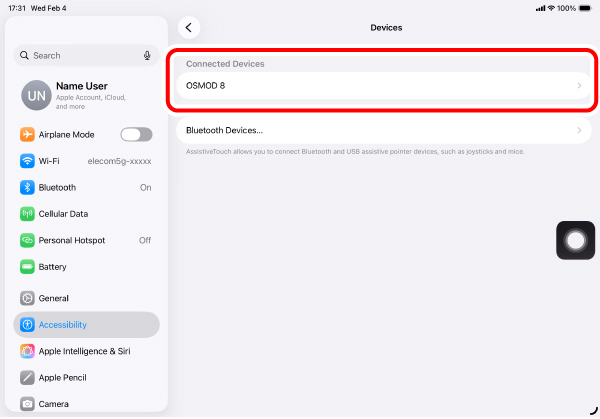
3) Tap “Customize Additional Buttons...”.
4) When the “Customize Button” screen loads, press a button on this product that you would like to add.
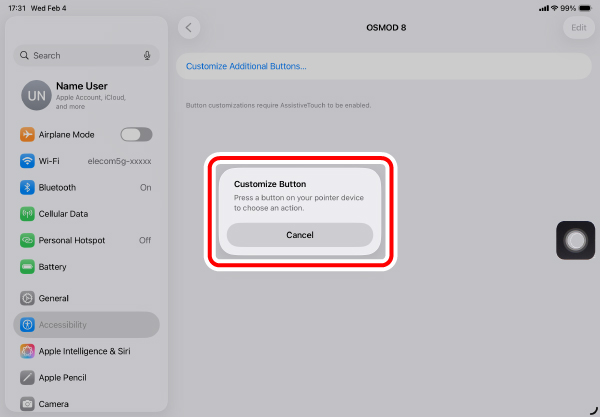
* When adding “Button 3 (wheel)”

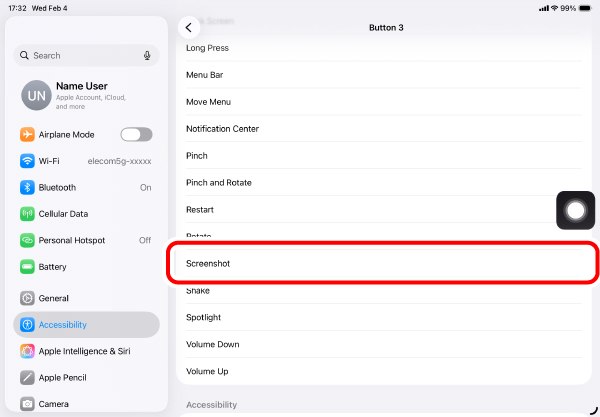
5) A list of all assignable functions loads. Tap the desired function to assign.
* When assigning “Screenshot” to “Button 3”
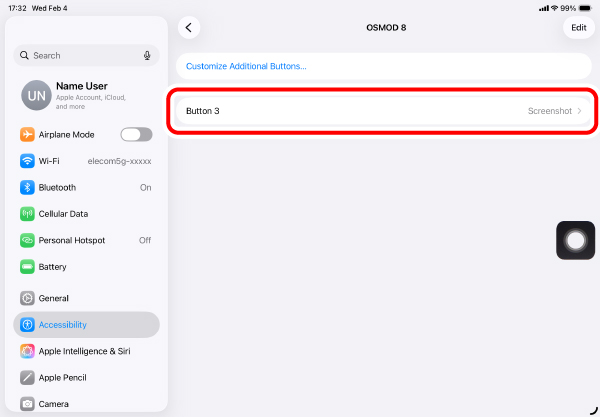
6) The function has been assigned to the button. To assign a function to another button, repeat the steps above.
When AssistiveTouch is off, the custom action function is disabled and only the initial right-click, left-click, and scroll wheel functions may be used.
Changing the scroll direction
Change the scroll direction for when the scroll wheel on the mouse is moved.
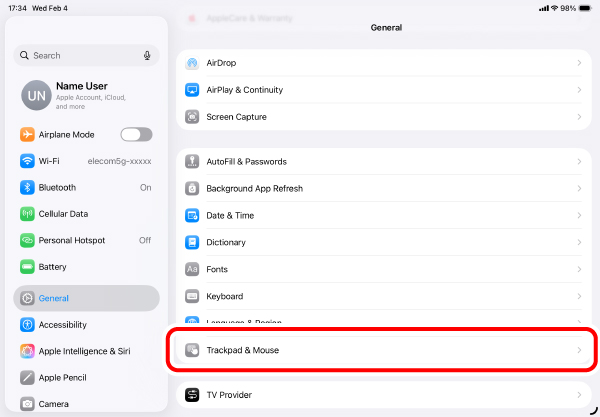
1) Tap “General” under “Settings” from the Home screen.
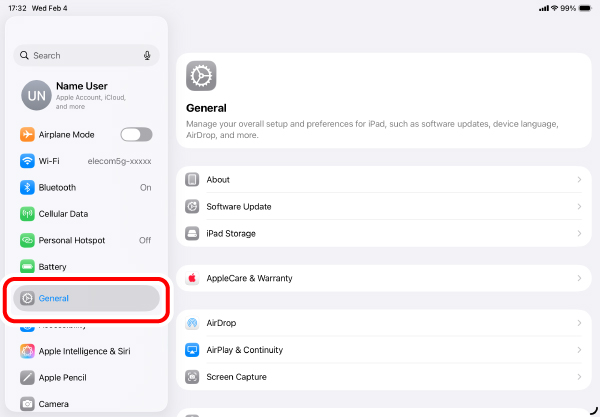
2) Tap “Trackpad & Mouse”.
3) Tapping “Natural Scrolling” to turn it on or off will change the scroll direction.
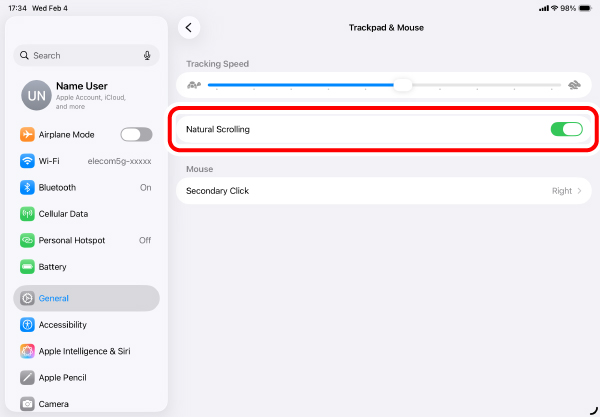
When “Natural Scrolling” is turned off, the scroll direction will be the same as the direction of the wheel movement.
1. Remove the battery insulating tab.
1) Remove the battery cover.
2) Pull out the battery insulating tab slowly while holding the battery.
3) Put the battery cover back on.
When replacing the battery...
1) Remove the battery cover.
2) Remove the battery.
3) Insert a new battery as indicated on the bottom of the battery compartment.
Ensure that the battery is inserted with the positive (+) and negative (-) terminals oriented correctly.
4) Put the battery cover back on.
2. Turn the power on.
1) Slide the power switch on the bottom to the ON position.
The connected device light turns on for three seconds.
* When the battery level is low, the connected device light selected by the connected device switching button flashes for five seconds.
Power-saving mode
When the mouse is left untouched for a certain period of time while the power is on, it automatically enters power-saving mode.
The mouse returns from power-saving mode when it is moved.
* Mouse operation may be unstable for two to three seconds after returning from the power-saving mode.
3. Pair with an Android device.
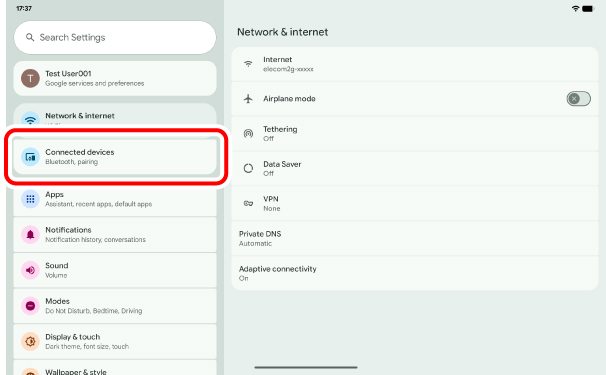
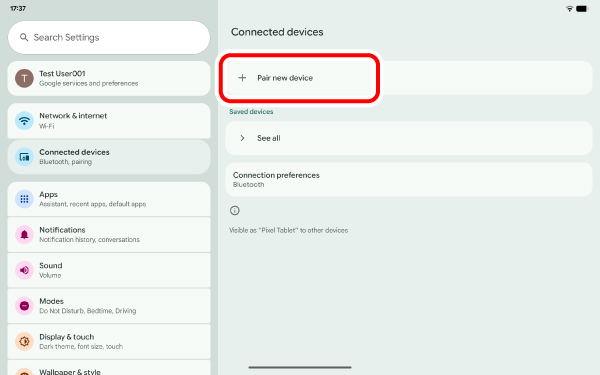
1) Tap “Settings” from the Home screen.
2) Tap “Connected devices”.
3) Tap “Pair new device”.
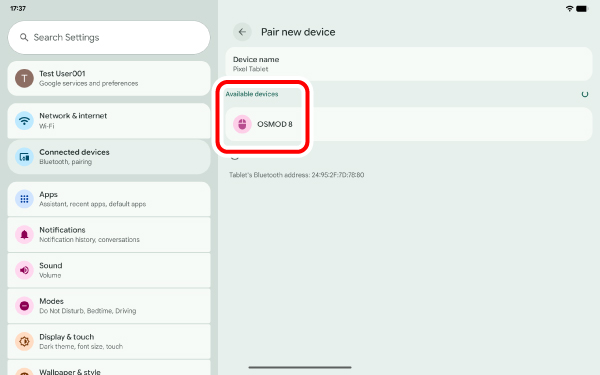
4) Use the connected device switching button to select ![]() or
or ![]() .
.
When there is no device that can be connected, such as when the mouse is initially started or after a reset
The mouse enters pairing mode, and the connected device light flashes blue rapidly. Proceed to Step 6.
5) Press the connected device switching button for three seconds and release it.
The mouse enters pairing mode, and the connected device light flashes blue rapidly.
6) Tap “OSMOD 8” under “Available devices”.
7) Tap “Pair”.
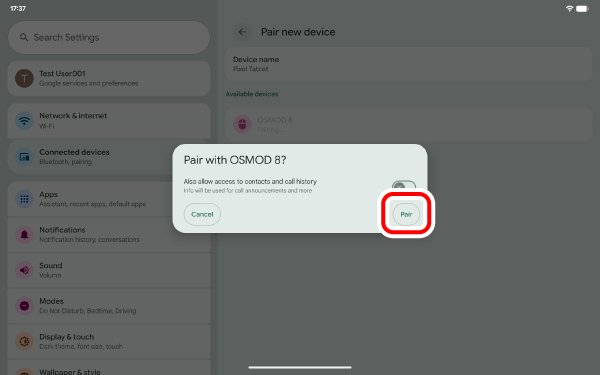
Pairing begins.
8) Pairing is complete when this product is added to “Other devices”.
The connected device light turns on for three seconds and then turns off.
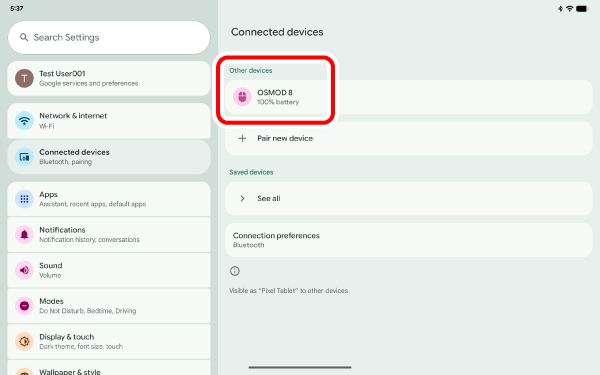
You can now use the mouse.
1. Remove the battery insulating tab.
1) Remove the battery cover.
2) Pull out the battery insulating tab slowly while holding the battery.
3) Put the battery cover back on.
When replacing the battery...
1) Remove the battery cover.
2) Remove the battery.
3) Insert a new battery as indicated on the bottom of the battery compartment.
Ensure that the battery is inserted with the positive (+) and negative (-) terminals oriented correctly.
4) Put the battery cover back on.
2. Turn the power on.
1) Slide the power switch on the bottom to the ON position.
The connected device light turns on for three seconds.
* When the battery level is low, the connected device light selected by the connected device switching button flashes for five seconds.
Power-saving mode
When the mouse is left untouched for a certain period of time while the power is on, it automatically enters power-saving mode.
The mouse returns from power-saving mode when it is moved.
* Mouse operation may be unstable for two to three seconds after returning from the power-saving mode.
3. Pair with a PC.
1) Click the task tray in the lower-right corner.
2) Click ![]() “Bluetooth” on the Quick Settings panel.
“Bluetooth” on the Quick Settings panel.
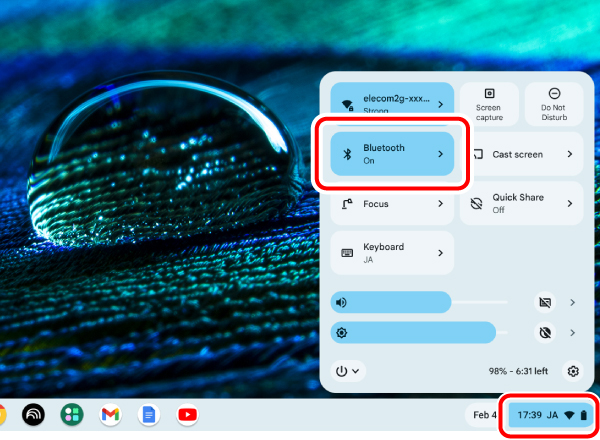
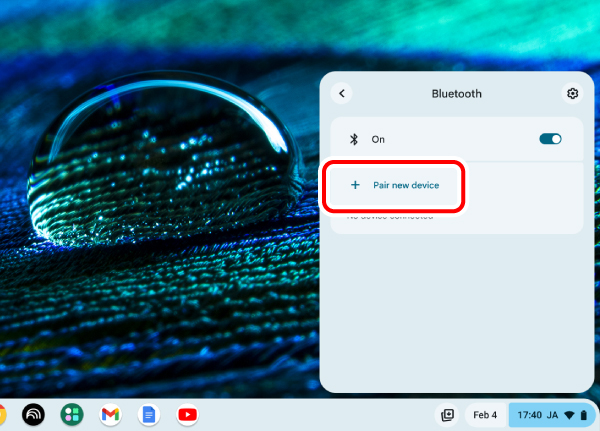
3) Under “Bluetooth”, click “Pair new device”.
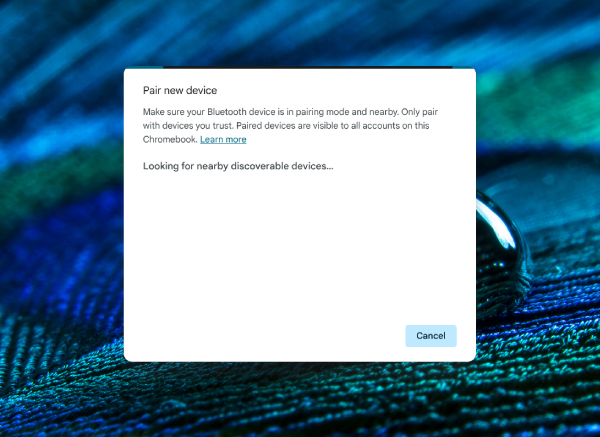
4) Use the connected device switching button to select ![]() or
or ![]() .
.
When there is no device that can be connected, such as when the mouse is initially started or after a reset
The mouse enters pairing mode, and the connected device light flashes blue rapidly. Proceed to Step 6.
5) While scanning for devices, press the connected device switching button for three seconds and release it.
The mouse enters pairing mode, and the connected device light flashes blue rapidly.
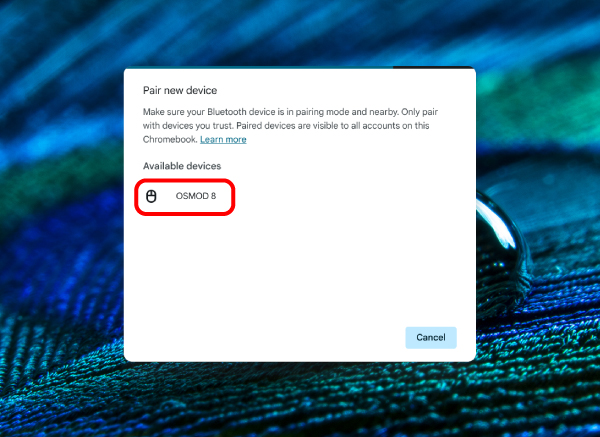
6) Click “OSMOD 8”.
Pairing begins.
7) “OSMOD 8 connected” will be displayed in the lower-right corner of the screen.
The connected device light turns on for three seconds and then turns off.

Click “Bluetooth” like in 2). Pairing is complete when “OSMOD 8” appears under “Currently connected”.
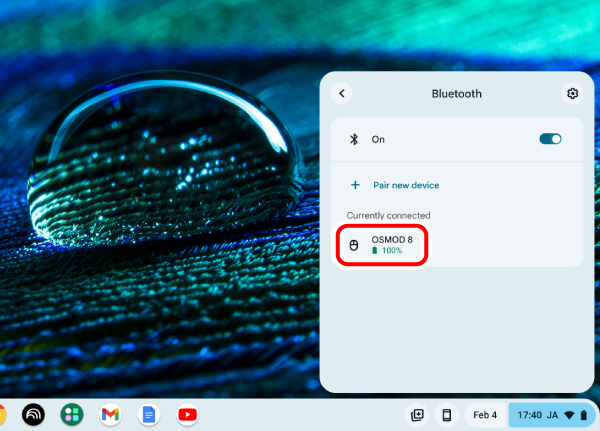
You can now use the mouse.
1. Remove the battery insulating tab.
1) Remove the battery cover.
2) Pull out the battery insulating tab slowly while holding the battery.
3) Put the battery cover back on.
When replacing the battery...
1) Remove the battery cover.
2) Remove the battery.
3) Insert a new battery as indicated on the bottom of the battery compartment.
Ensure that the battery is inserted with the positive (+) and negative (-) terminals oriented correctly.
4) Put the battery cover back on.
2. Turn the power on.
1) Slide the power switch on the bottom to the ON position.
The connected device light turns on for three seconds.
* When the battery level is low, the connected device light selected by the connected device switching button flashes for five seconds.
Power-saving mode
When the mouse is left untouched for a certain period of time while the power is on, it automatically enters power-saving mode.
The mouse returns from power-saving mode when it is moved.
* Mouse operation may be unstable for two to three seconds after returning from the power-saving mode.
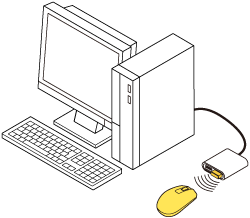
3. Connect to a PC.
1) Start up your PC.
Wait until the PC has started up and can be operated.
2) Use the connected device switching button to select ![]() .
.
The connected device light turns on white for three seconds.
For details on selecting the connected device, refer to “Switching the connected device”.
3) Insert the receiver into the PC’s USB-A port.

You may use any USB-A port.

When removing the receiver
This product supports hot plugging. You can remove the receiver even when the PC is running.
4) The driver will be automatically installed, and you will then be able to use the mouse.
You can now use the mouse.
Changing the mouse pointer speed
Adjust the mouse pointer movement speed on your PC if the mouse pointer moves too fast or too slow.
1) Click the task tray in the lower-right corner.
2) Click the gear icon ![]() (settings) on the Quick Settings panel.
(settings) on the Quick Settings panel.
The settings page appears.
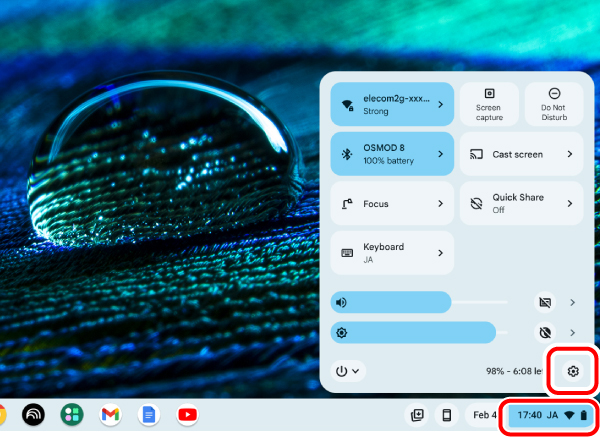
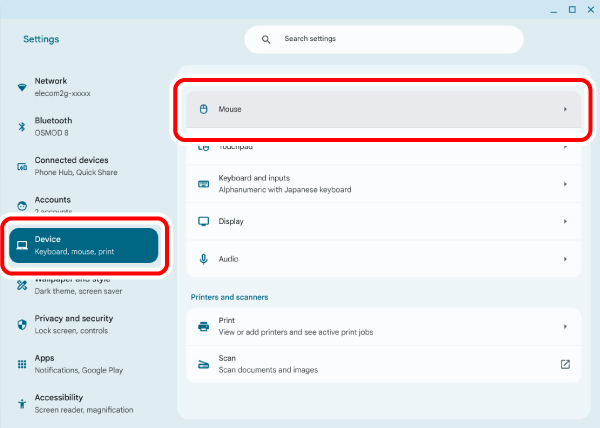
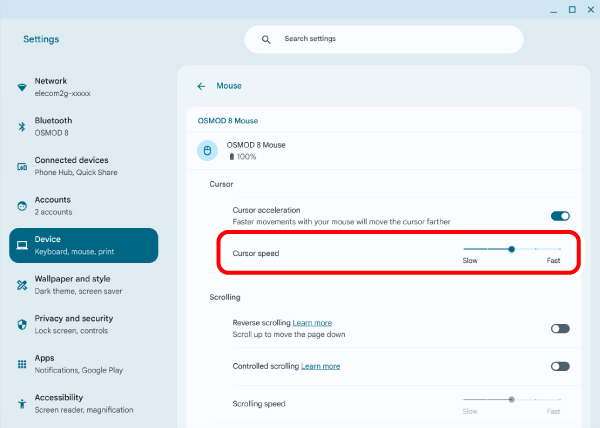
3) Click “Mouse” under “Device”.
4) Adjust the mouse pointer speed using the “Cursor speed” slider for this product.
Changing the number of lines scrolled per wheel notch
1) Click the task tray in the lower-right corner.
2) Click the gear icon ![]() (settings) on the Quick Settings panel.
(settings) on the Quick Settings panel.
The settings page appears.
3) Click “Mouse” under “Device”.
4) If “Controlled scrolling” for this product is disabled, click to enable it.
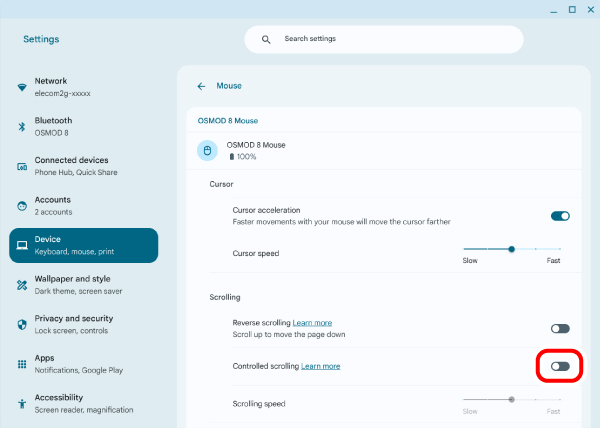
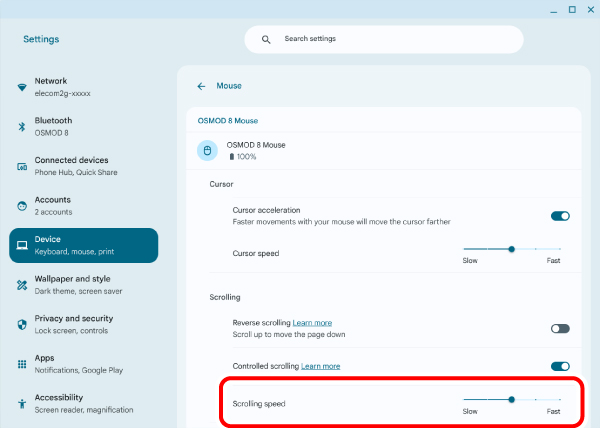
5) Adjust the “Scrolling speed” slider bar for this product to adjust the number of lines scrolled.
Changing the scroll direction
Change the scroll direction for when the scroll wheel on the mouse is moved.
1) Click the task tray in the lower-right corner.
2) Click the gear icon ![]() (settings) on the Quick Settings panel.
(settings) on the Quick Settings panel.
The settings page appears.
3) Click “Mouse” under “Device”.
4) Click “Reverse scrolling” for this product to enable or disabled scrolling in the reverse direction.
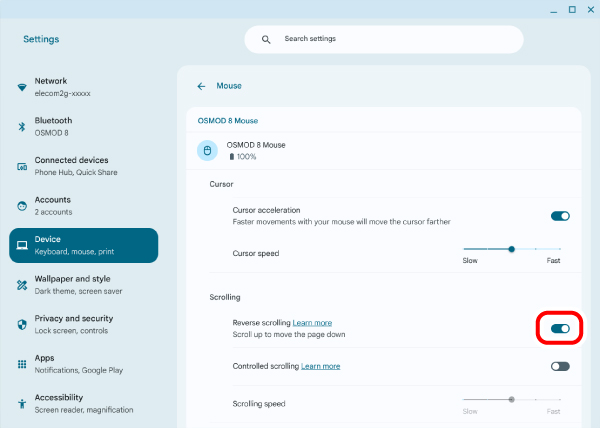
The scroll direction is the reverse of the direction of the scroll wheel movement when “Reverse scrolling” is turned on.
Try the following if the mouse operates abnormally.
① Check that the power switch on the mouse is in the ON position.
② Check that the battery is inserted correctly and that it is not empty.
* Turning off the power when the mouse is not used for a long period of time can extend the battery life.
③ Check the Bluetooth connection.
④ Change the usage distance between your PC and the mouse.
This wireless device uses the 2.4 GHz band. Use the mouse within range of the PC.
Average radio wave range
Non-magnetic surface (such as wooden desks): approximately 10 m (32.81 ft)
Magnetic surface (such as steel desks): approximately 3 m (9.85 ft)
* These values were obtained in ELECOM’s test environment and are not guaranteed. It may be shorter depending on the status of the 2.4 GHz band radio waves in the usage environment.
⑤ Reboot the PC.
The mouse may become unstable depending on the condition of the PC. Restart the PC.
⑥ Update your PC’s OS to the latest version.
The mouse may become unstable when the OS version of the PC is old. Update your PC’s OS to the latest version.
⑦ Update the Bluetooth driver. (If you are using a Windows® PC)
The mouse may not work normally when the PC’s Bluetooth driver is not the latest version. Check the manufacturer of the Bluetooth function installed on your PC and update the driver.
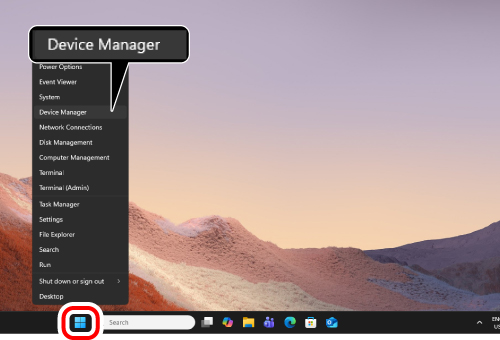
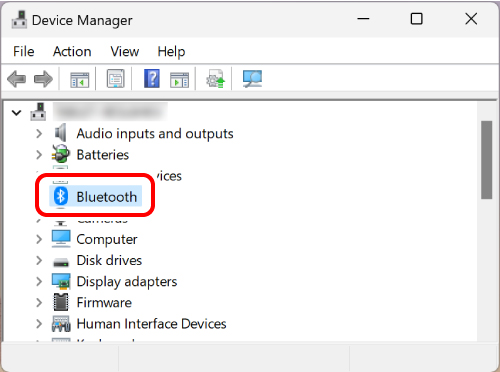
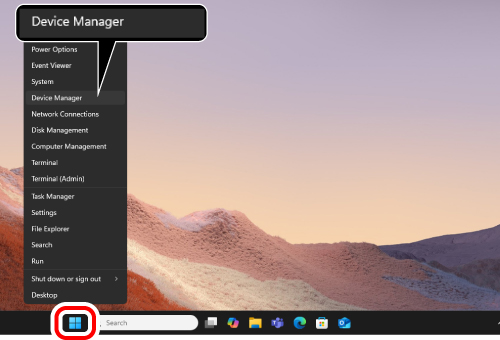
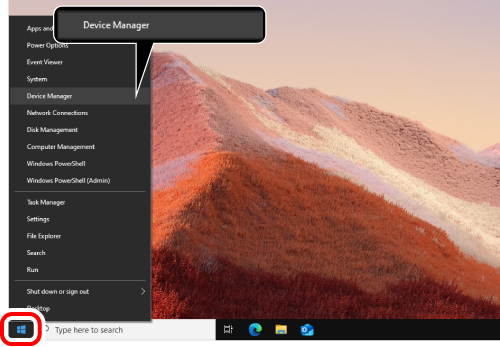
1) Right-click “Start” and open “Device Manager”.
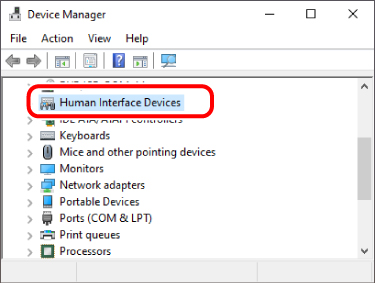
2) Click “Bluetooth”.
3) Check the manufacturer of the Bluetooth function installed on your PC.
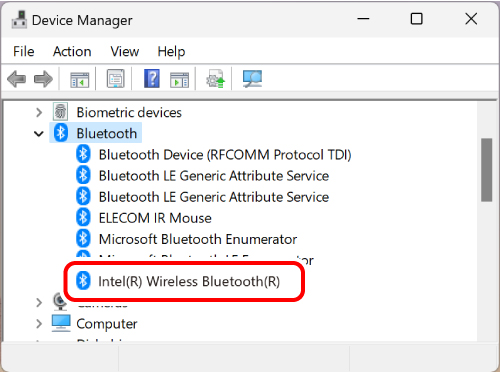
The following steps illustrate the procedure when the Bluetooth function is manufactured by Intel® Corporation.
For other manufacturers or if you do not know the manufacturer, check the user manual of your PC or contact the manufacturer of your PC for instructions on how to update the Bluetooth driver.
4) Search for “Intel® Driver & Support Assistant” on your browser and download the installer from Intel’s website.
5) Follow the instructions of the downloaded installer to install “Intel® Driver & Support Assistant”.
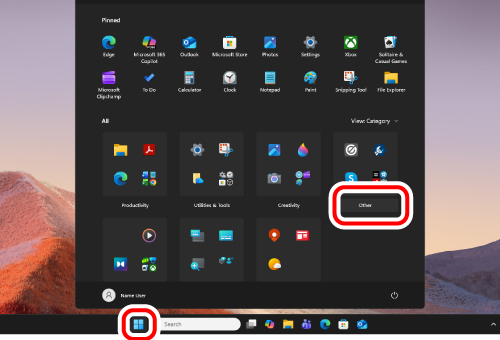
6) Click “Start” and then “Other”.
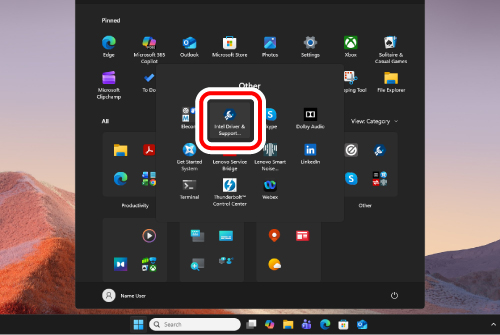
7) Click “Intel Driver & Support Assistant”.
8) The Intel support page will automatically open on your browser and a list of drivers and software updates that can be used on your PC will be displayed.
9) Download “Intel® Wireless Bluetooth®” from the list if available.
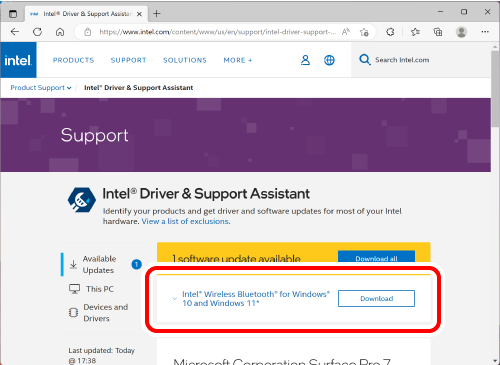
* The display on your browser may change depending on your PC environment and support page updates.
Inquire with Intel for the latest information.
10) Follow the instructions of the downloaded installer to install the Bluetooth driver.
With this, the Bluetooth driver is updated.
⑧ When using the receiver or a USB-connected Bluetooth receiver, change the receiver connection.
Depending on the specifications of the PC’s USB port or USB hub, other USB 3.0 devices used simultaneously with the mouse may generate noise that can degrade the 2.4 GHz band signal in the vicinity.
Examples of USB devices that may degrade the 2.4 GHz band signal
You may be able to improve the situation with the following method.
Connect the mouse receiver or Bluetooth receiver to another USB port away from other USB 3.0 devices in use simultaneously.
Connect the mouse receiver or Bluetooth receiver to a USB 2.0 hub or to an extension cable.
⑨ Check power-saving settings for connected devices. (If you are using a Windows® PC)
On Windows, in order to reduce power consumption, depending on the PC, the power of the USB-connected products is set to turn off automatically. You can change the settings in the following ways:
For Windows 11
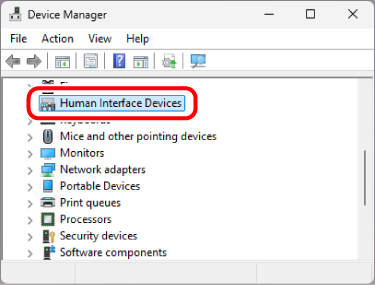
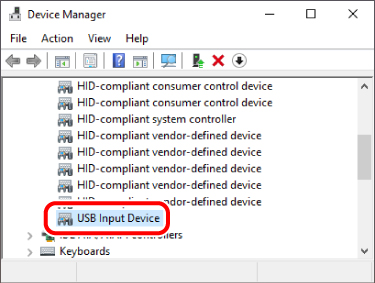
1) Right-click “Start” and open “Device Manager”.
2) Click “Human Interface Devices”.
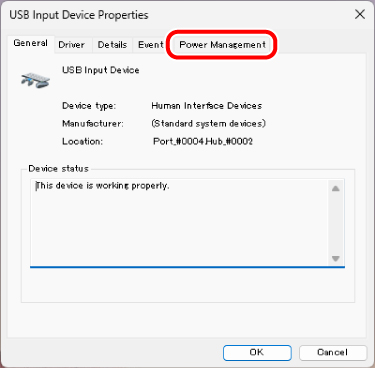
3) Double click “USB Input Device”.

There may be several USB Input Devices listed. In this case, perform the following actions for all USB Input Devices.
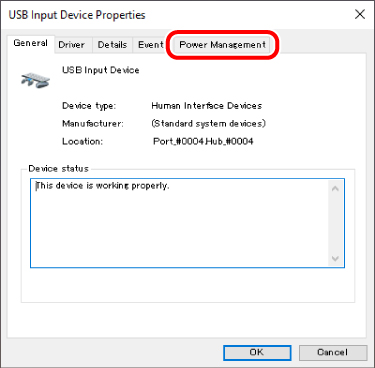
4) On the “USB Input Device Properties” screen, click the “Power Management” tab.
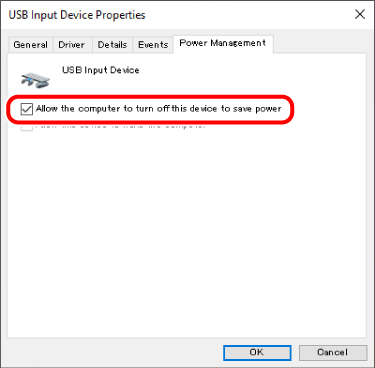
5) Click “Allow the computer to turn off this device to save power” to remove the check mark.

6) Click “OK” to confirm the settings.
7) Click “x” (close) in the upper-right corner to close “Device Manager”.
For Windows 10
1) Right-click “Start” and open “Device Manager”.
2) Click “Human Interface Devices”.
3) Double click “USB Input Device”.
There may be several USB Input Devices listed. In this case, perform the following actions for all USB Input Devices.
4) On the “USB Input Device Properties” screen, click the “Power Management” tab.
5) Click “Allow the computer to turn off this device to save power” to remove the check mark.
6) Click “OK” to confirm the settings.
7) Click “x” (close) in the upper-right corner to close “Device Manager”.


